Commands
Through our REST-api you can send commands to your devices such as queueing LoRa downlinks and including/excluding z-wave devices. This documentation is designed to compliment our swagger documentation and the url is public.yggio.net/api/iotnodes/command.
LoRa
Downlink
The way you can generally use downlink is as follows:
-
Queue a downlink, when the device is scheduled to recieve a downlink (depending on class) it will disapear from the queue
-
Get the queue, this is so that you, the user, can look at what's currently in the queue
-
Flush the queue, removing any queued downlinks from the queue
How to use these three commands differ from integration to integration.
ChirpStack downlink
Queue an item
method: PUT
body:
{
  "command":"loraAppServerQueueDownlink", //string, use as is
  "integrationName":"ChirpStack", //string, use as is
  "iotnodeId":"5d2c6561ecb9a30aa5fc3e41", //string, yggioId of the device
  "data": {
    "confirmed": false, //bool, we're currently not using confirmed,
    "reference": "I sent this to configure blabla", //string, reference to the payload in plain text
    "fPort": "5", //string, port
    "data": "1111" //string, hex, payload to be sent to the device
  }
}
Get the queue
method: PUT
body:
{
  "command": "loraAppServerGetDeviceQueue", //string, use as is
  "integrationName": "ChirpStack", //string, use as is
  "iotnodeId": "5d2c6561ecb9a30aa5fc3e41", //string, yggioId of the device
}
Flush the queue
method: PUT
body:
{
  "command": "loraAppServerFlushQueue", //string, use as is
  "integrationName": "ChirpStack", //string, use as is
  "iotnodeId": "5d2c6561ecb9a30aa5fc3e41", //string, yggioId of the device
}
Netmore downlink
Queue an item
method: PUT
body:
{
  "command": "apiCall", //string, use as is
  "iotnodeId": "60a3b1fd26b01f00074aa625", //string, yggioId of the device
  "data": {
    "callName": "sendDownlink", //string, use as is
    "callData": {
      "devEui": "70B3D52C00019041", //string, devEui of the iotnode
      "payload":{
        "fPort": "2", //string, port
        "payloadHex": "aaaaa" //string, hex, payload to be sent to the device
      }
    }
  }
}
Get the queue
method: PUT
body:
{
  "command": "apiCall", //string, use as is
  "iotnodeId": "60a3b1fd26b01f00074aa625", //string, yggioId of the device
  "data":{
    "callName": "getDownlinks", //string, use as is
    "callData": {
      "devEui": "70B3D52C00019041" //string, devEui of the iotnode
    }
  }
}
Flush the queue
method: PUT
body:
{
  "command": "apiCall", //string, use as is
  "iotnodeId": "60a3b1fd26b01f00074aa625", //string, yggioId of the device
  "data": {
    "callName": "clearDownlinks", //string, use as is
    "callData": {
      "devEui": "70B3D52C00019041" //string, devEui of the iotnode
    }
  }
}
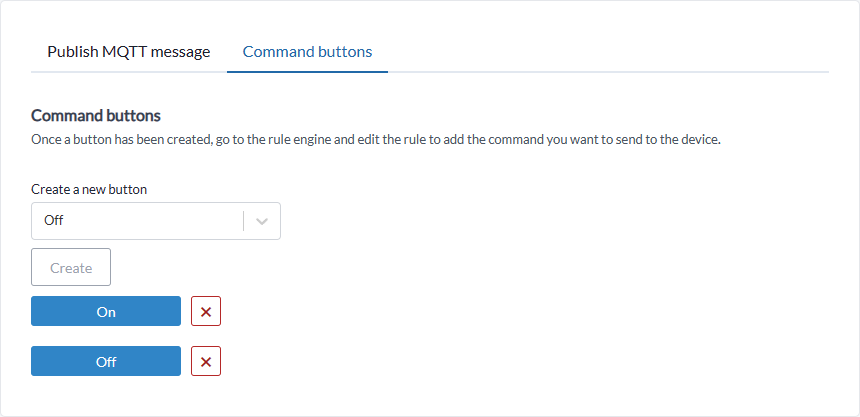
Comand buttons

Create a button that will trigger a rule once pressed
- Select a preset in the dropdown list, or choose custom to enter your own text
- Head over to Rule Engine and go to Rules
- The rule connected to the button will have the following format:
device-name.button-namee.g.Basement-light.On - Add an action to the rule and hit Save. There is no need to add a trigger condition, since the rule is already using the button as the trigger condition.