Hubitat Integration
The Hubitat-Yggio platform integration is a comprehensive solution that connects the Hubitat home automation platform with the Yggio IoT platform. This integration, applicable for Z-Wave, Zigbee and Matter devices, is built around several key components:
-
Connector: Establishes a connection between Hubitat and Yggio's MQTT broker, enabling real-time communication between the two platforms.
-
Uplink Data-interpreter: Parses MQTT topics from Hubitat and creates corresponding nodes within Yggio, handling a variety of MQTT topics including device events, heartbeat messages, and initialization messages.
-
Downlink: Listens for specific MQTT topics from Yggio that represent commands to be executed on Hubitat devices, providing two-way synchronization between the platforms.
-
Device Synchronization: Ensures that any changes in device states on Hubitat are reflected in Yggio, and vice versa, allowing for real-time control and status updates of devices in both systems.
-
Heartbeat Handling: Manages heartbeat messages, creating and updating a specific node for each heartbeat message received.
This integration leverages Sensative's Hubitat App and Driver, and provides robust, real-time synchronization between Hubitat and Yggio, enhancing user experience and system performance.
Please note that this guide is divided into two main parts: the Hubitat User Interface and the Yggio User Interface. Both parts are interrelated and necessary to get the integration working.
Hubitat User Interface
I. Download and Setup Code Files
In this section, we'll download the necessary code files and open them in a text editor. Here's how you do it:
-
Download the App and Driver code files from the following GitHub repository:
https://github.com/Sensative/hubitat
Files to download
a. Sensative-Yggio-Hubitat-MQTT-App.groovy b. Sensative-Yggio-Hubitat-MQTT-driver.groovy
Open these files in a text editor of your choice.
II. Install the Driver in Hubitat
In this section, we'll install the driver in Hubitat. The driver is a piece of code that allows Hubitat to communicate with the Yggio platform. Here's how you do it:
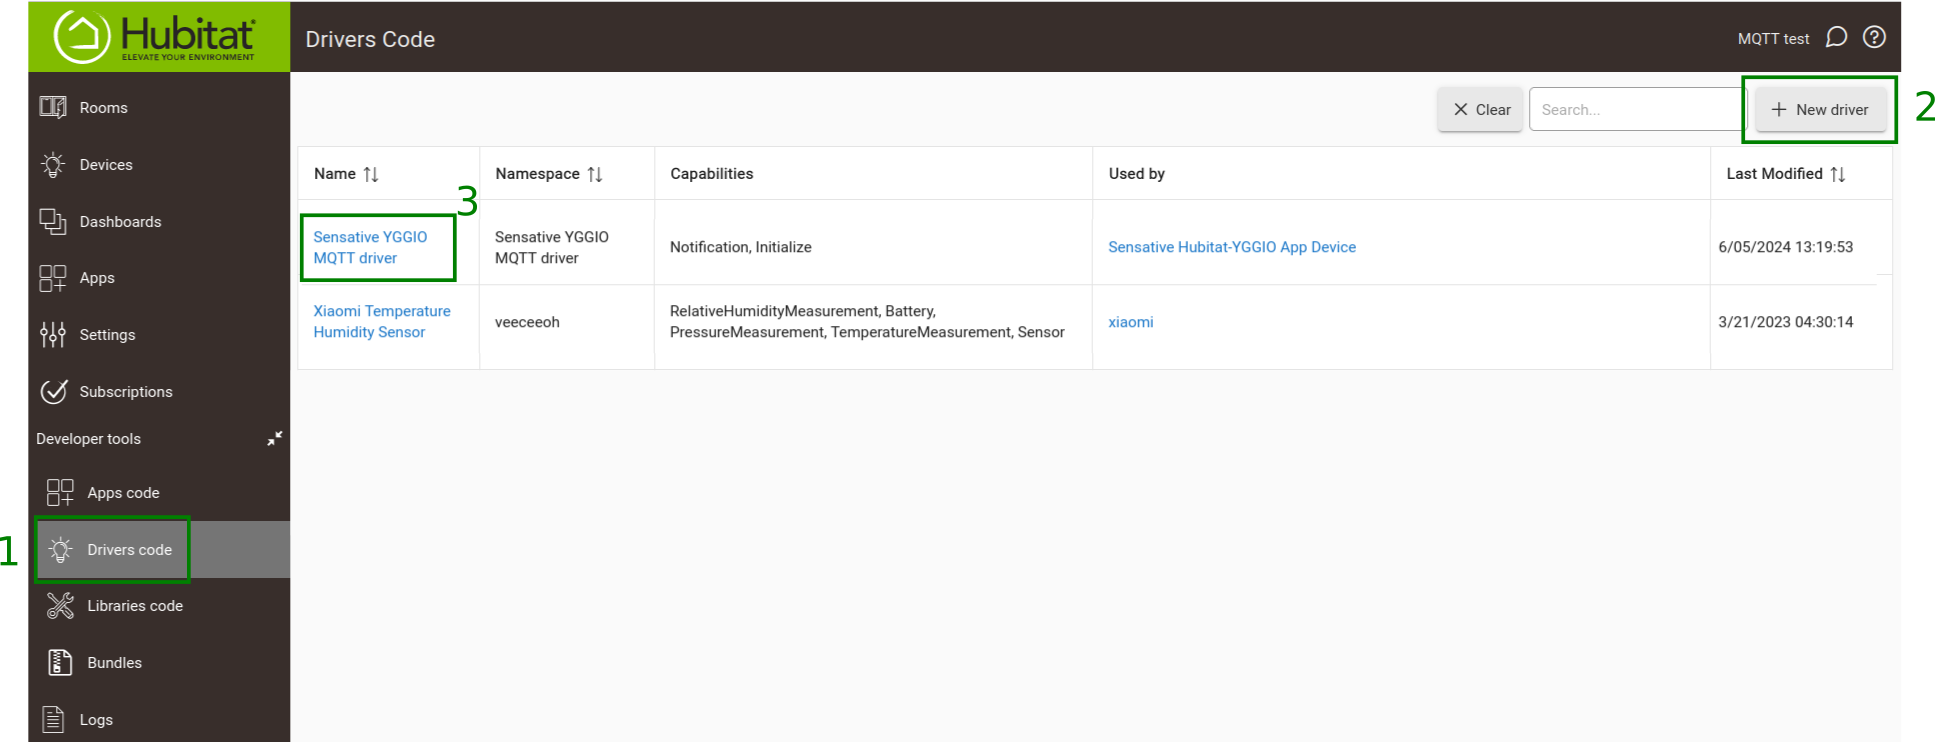
- In the Hubitat User Interface, go to Developer Tools -> Drivers Code on the left.
- Click the New Driver button in the top right corner.
- Open the
Sensative-Yggio-Hubitat-MQTT-driver.groovyfile that you downloaded earlier. Copy and paste the code from this file into the editor in Hubitat, then click Save. The driver will be saved under the name "Sensative Yggio MQTT Driver".
III. Install the App code in Hubitat
In this section, we'll install the app in Hubitat. The app is a piece of code that allows Hubitat to interact with the Yggio platform. Here's how you do it:
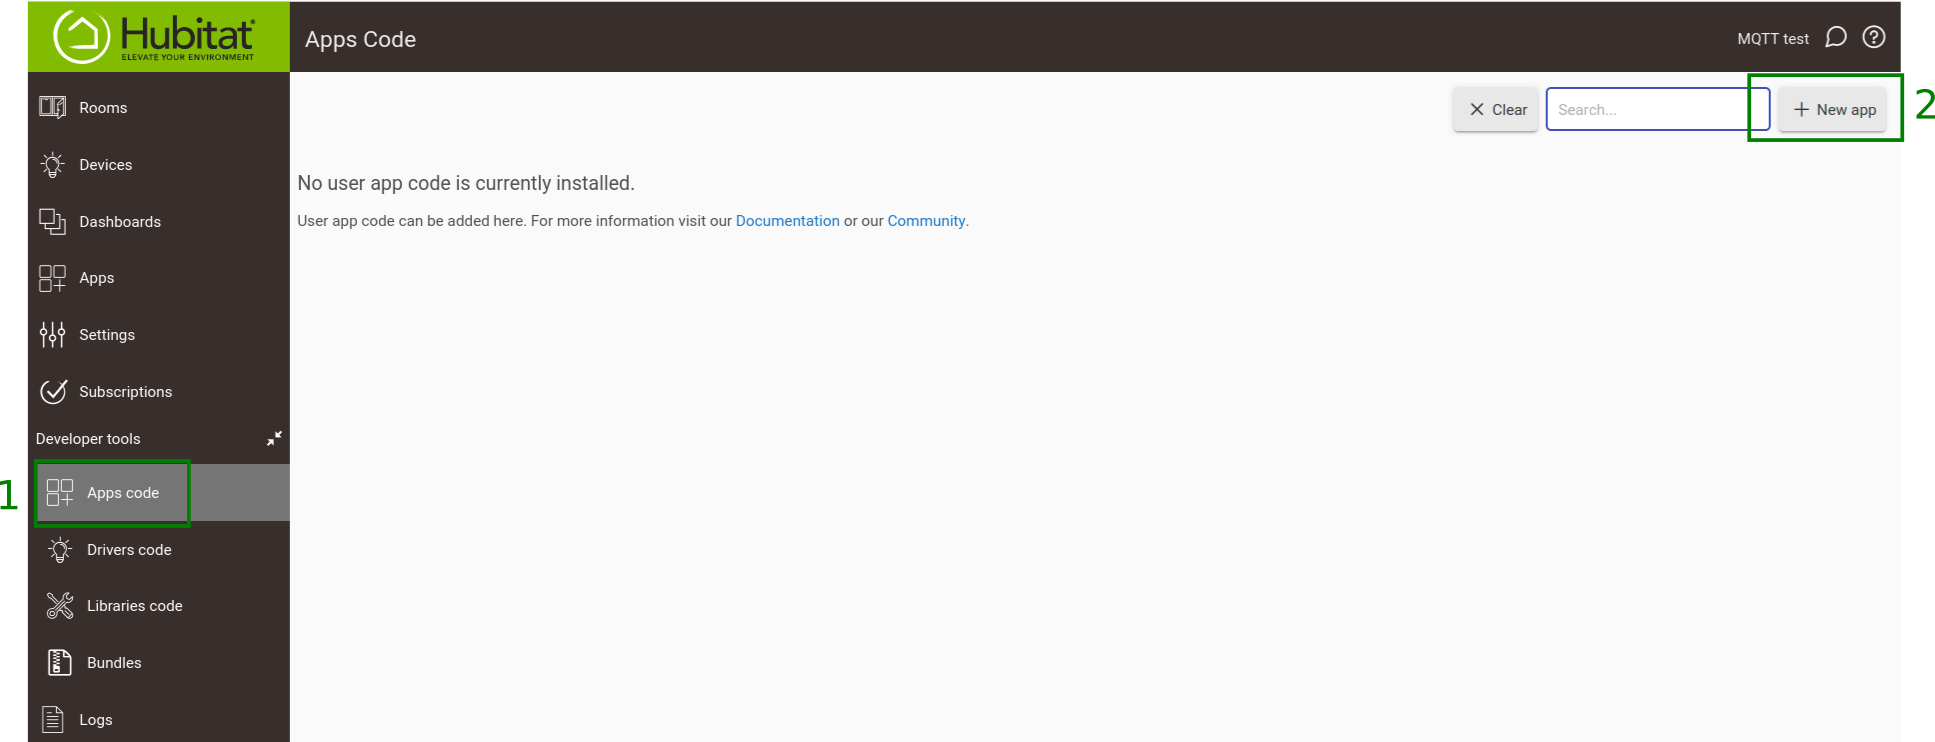
- In the Hubitat User Interface, go to Developer Tools -> Apps Code on the left.
- Click the New App button in the top right corner.
- Open the
Sensative-Yggio-Hubitat-MQTT-App.groovyfile that you downloaded earlier. Copy and paste the code from this file into the editor in Hubitat, then click Save. The app will be saved under the name "Sensative Yggio MQTT App".
IV. Create and Configure the Virtual Device
Important: Before proceeding with this step, ensure you have completed sections VI to XI. The details required in this section are either provided by the Yggio Admin or obtained from the steps in sections VI to XI.
In this section, we'll create a virtual device in Hubitat and configure it to connect to the Yggio platform. Here's how you do it:
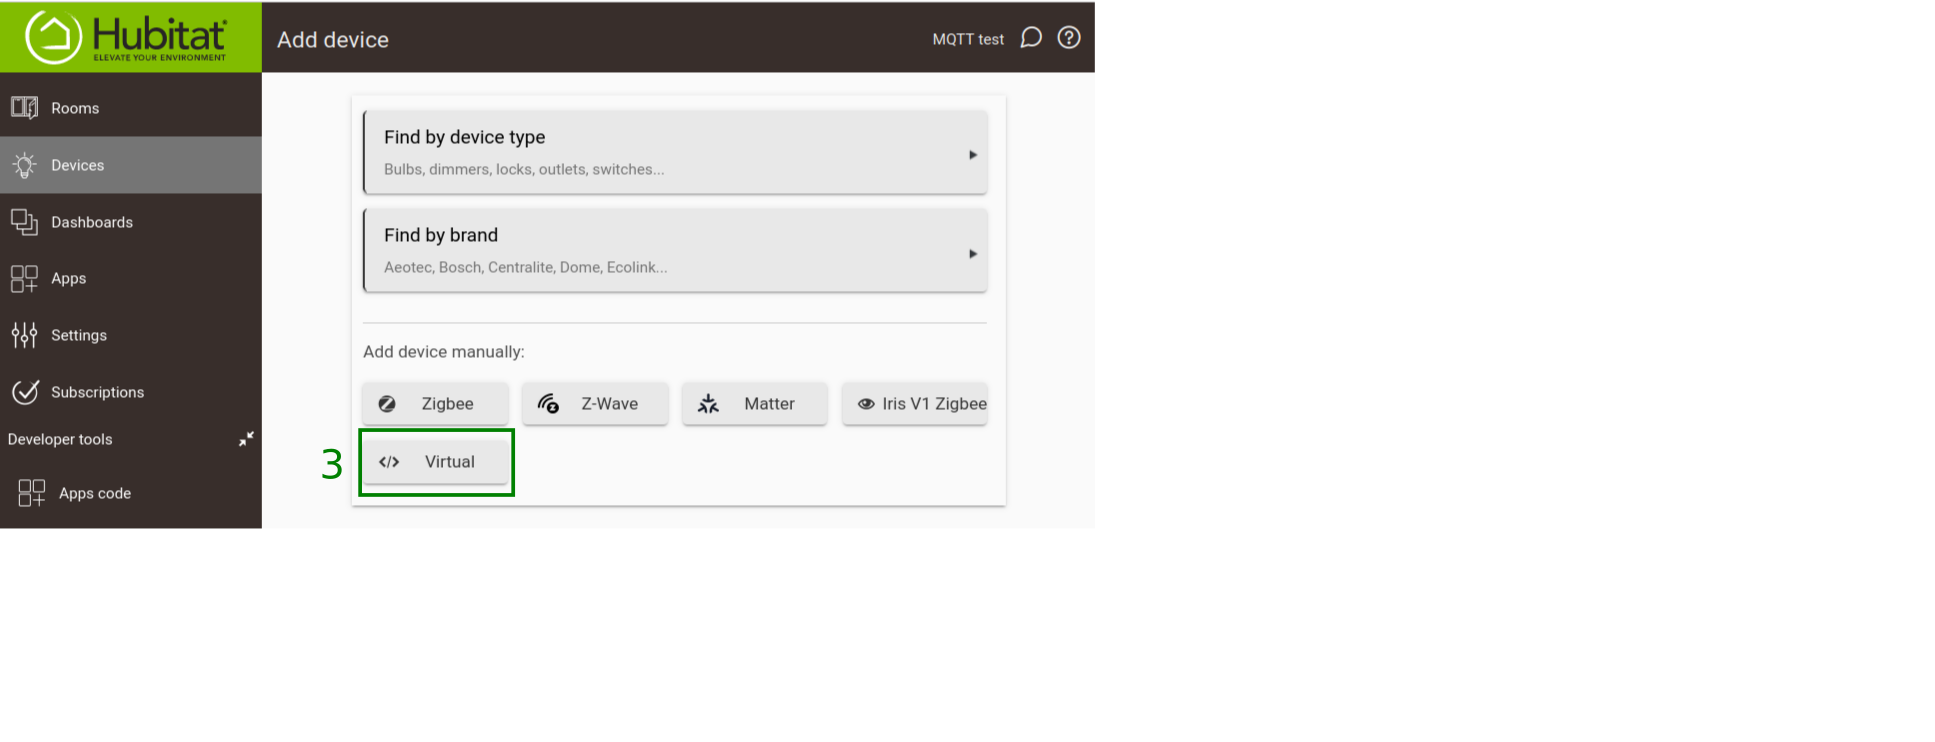
- In the Hubitat User Interface, go to Devices on the left.
- Click the Add Device button in the top right corner.
- Click the Virtual button.
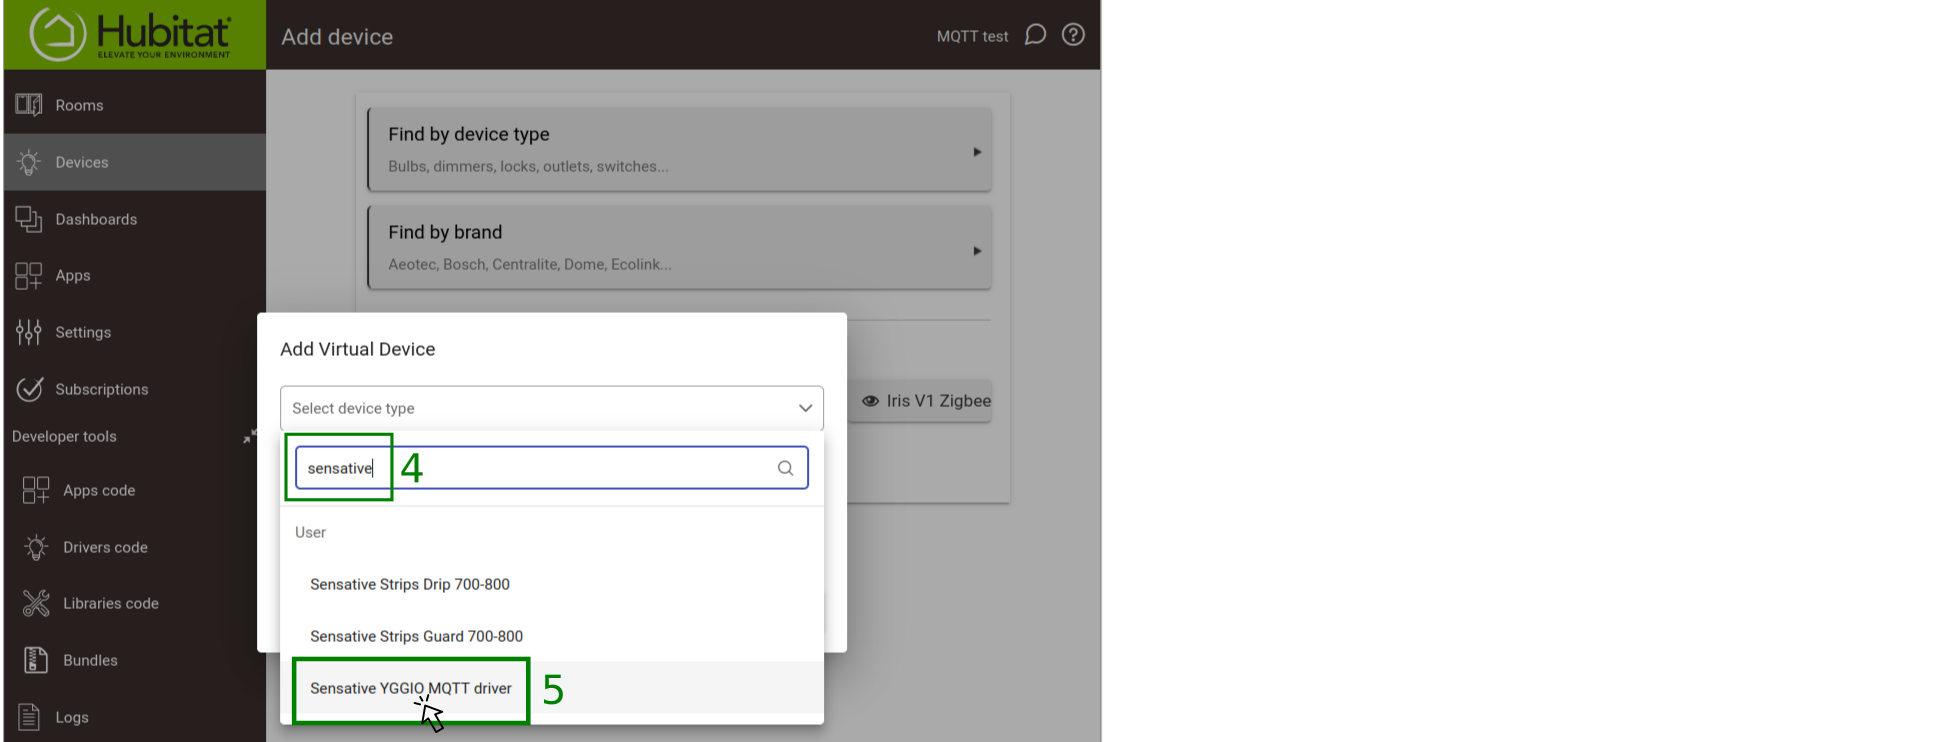
- In the Device Information section, under the Type dropdown, type in "Sensative" to filter drivers.
- Select Sensative Yggio MQTT Driver.
- Give the device a memorable name, e.g., "Sensative Hubitat-Yggio App Device".
- Click Save Device.
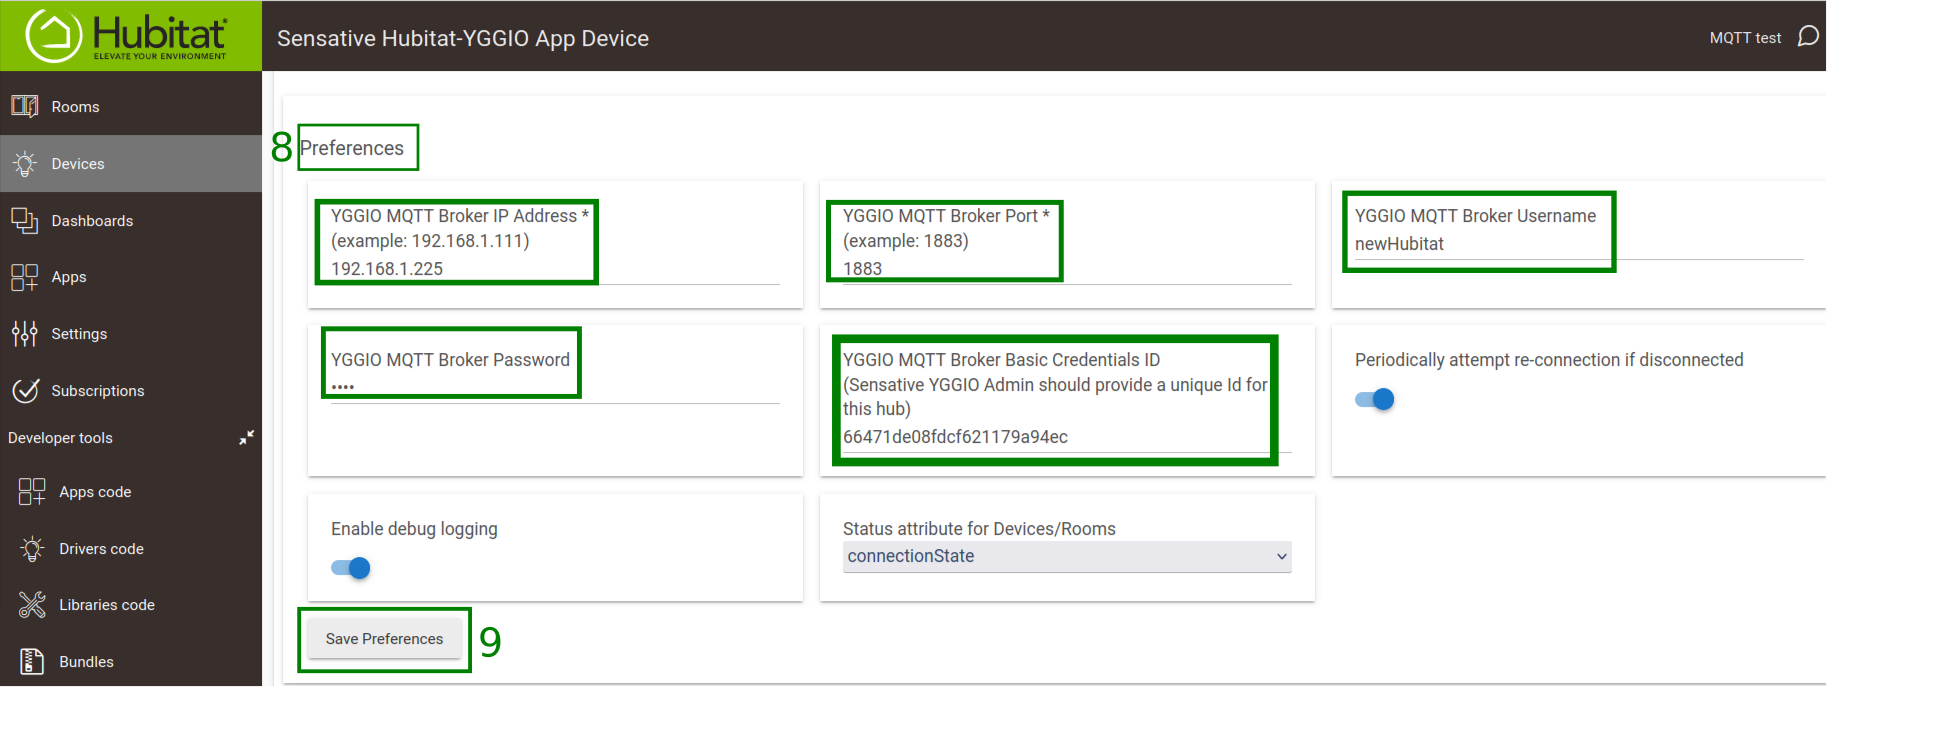
- Enter the following mandatory credential details in the Preferences section:
- Yggio MQTT Broker IP Address
- Yggio MQTT Broker Port
- Yggio MQTT Broker Username
- Yggio MQTT Broker Password
- Yggio MQTT Broker Basic Credentials ID
- Click Save Preferences.
- If it doesn't connect right away, click the Connect button in the User Interface.


V. Setup the Sensative Yggio MQTT App
In this section, we'll set up the app in Hubitat. The app allows Hubitat to interact with the Yggio platform. Here's how you do it:
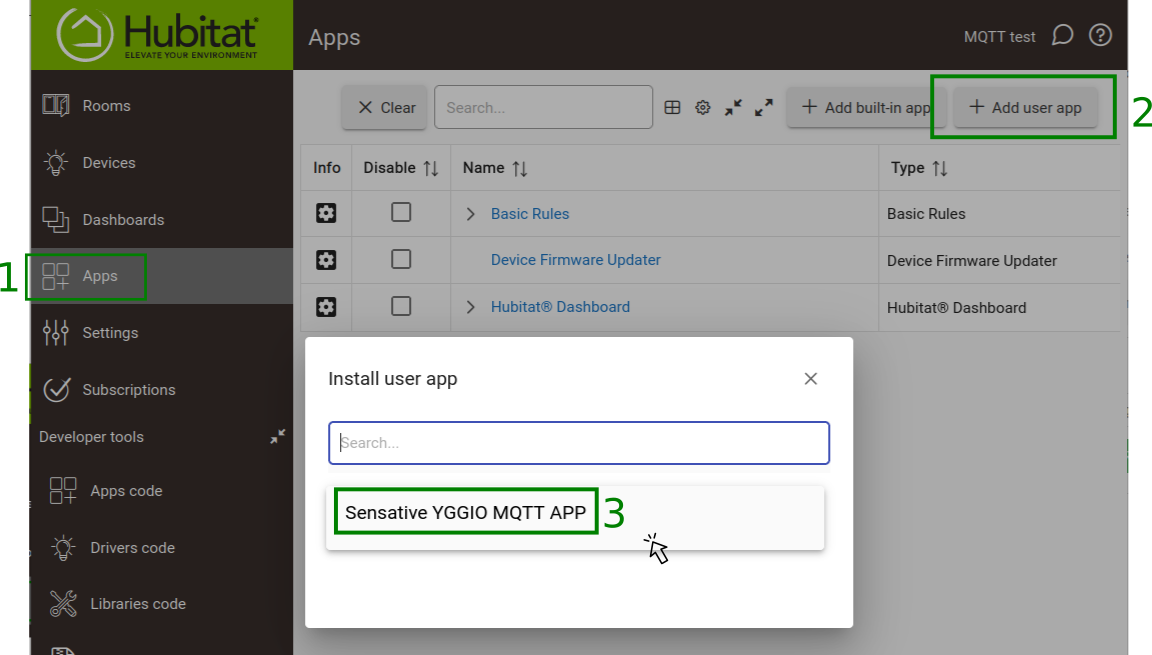
- In the Hubitat User Interface, go to Apps on the left.
- Click the Add user app button in the top right corner.
- Click on Sensative Yggio MQTT App.
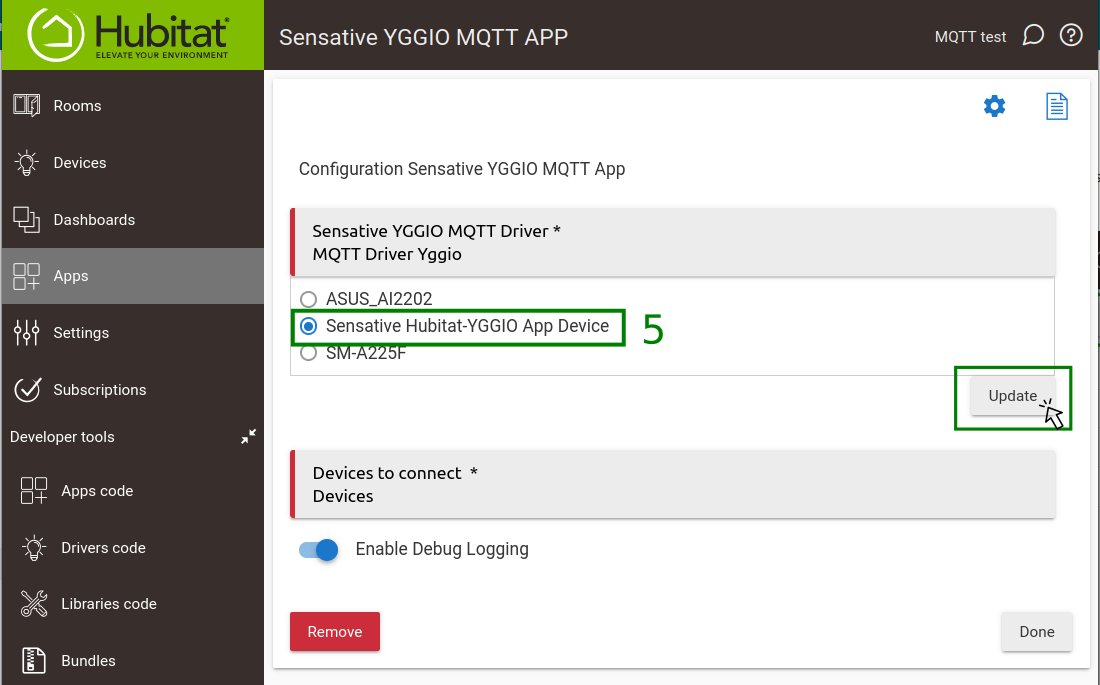
- The configuration page for Sensative Yggio MQTT App will open.
- In the configuration page, select the device that you created earlier in the Sensative Yggio MQTT Driver section and click the Update button.
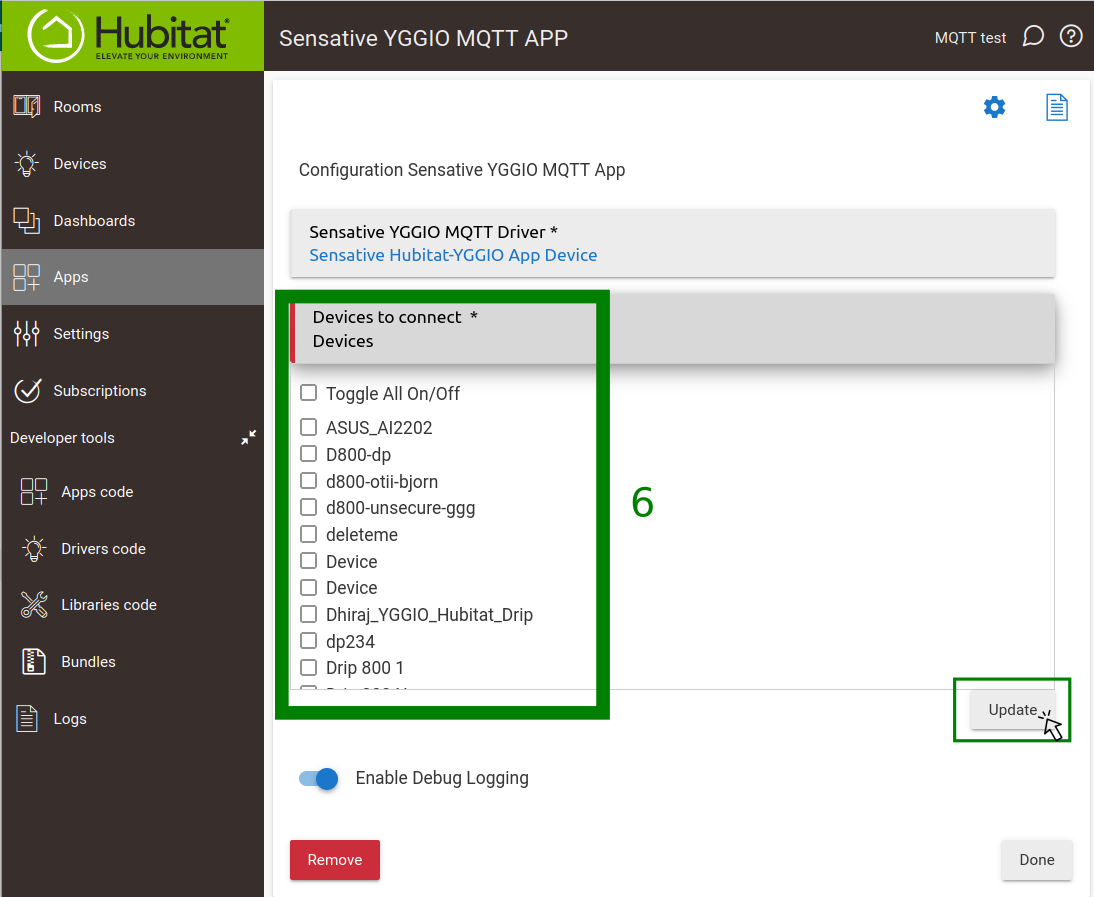
- Select the devices that you want to connect to the Yggio platform and click the Done button. If you add new devices later and want to sync them with the Yggio platform, revisit this section, select the new devices, and click the Done button.

Yggio User Interface
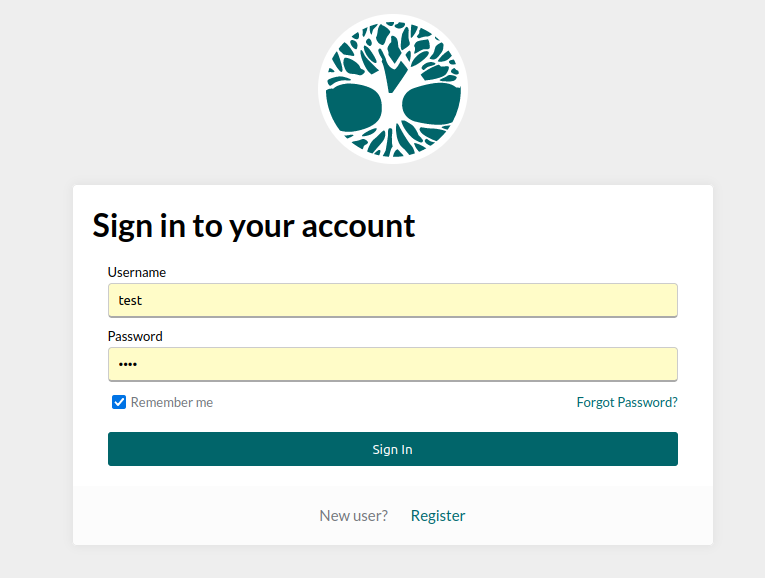
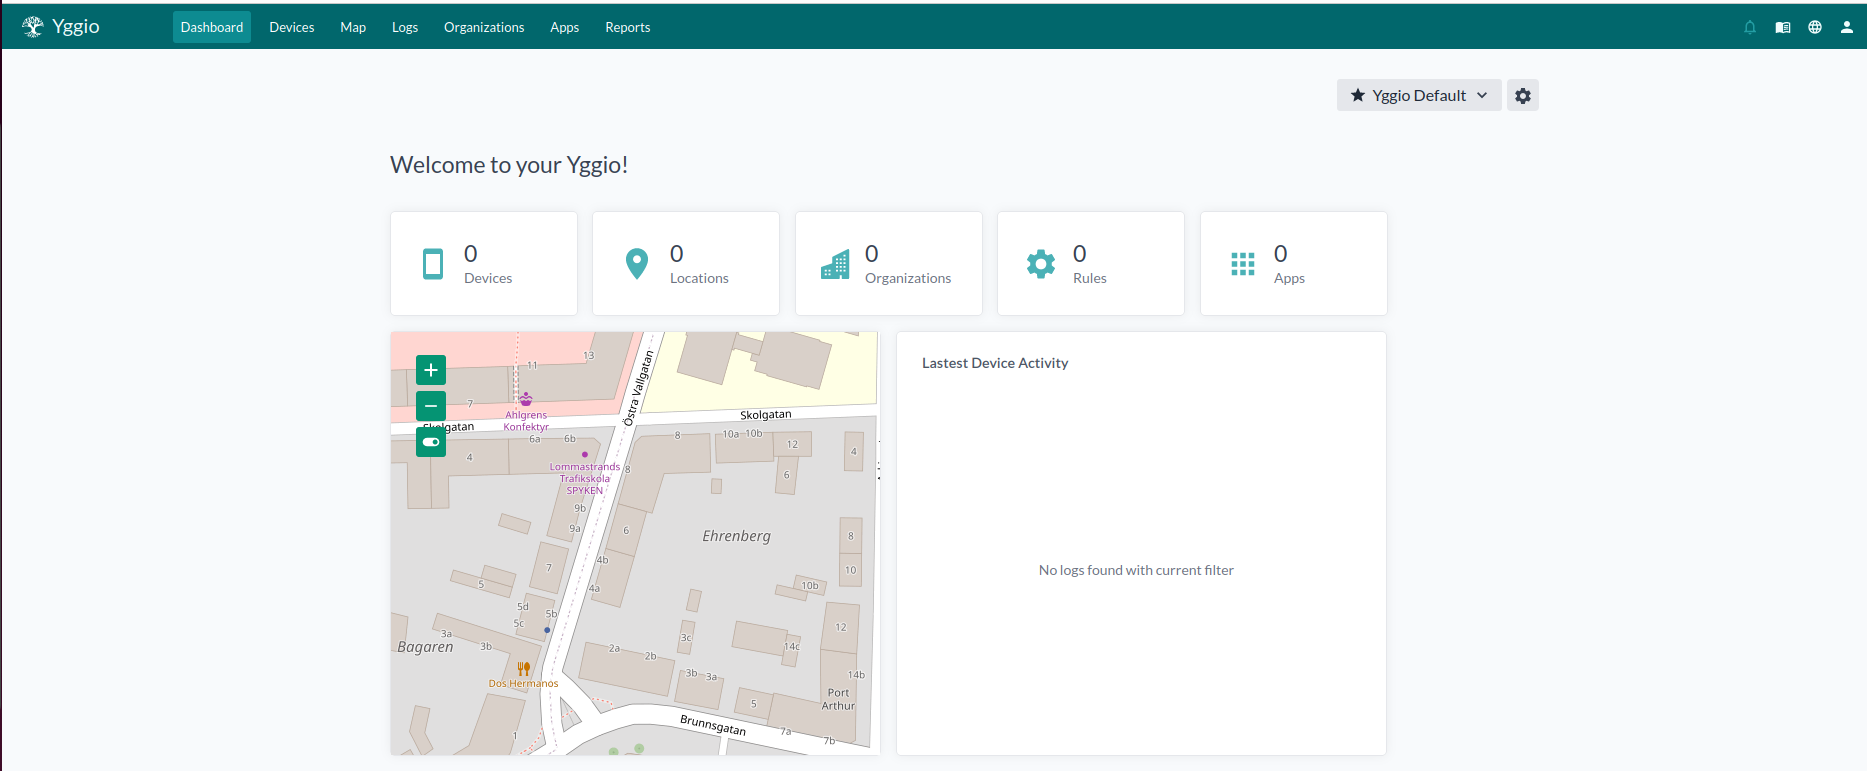
VI. Logging into Yggio
In this section, we'll log into the Yggio platform. Logging in allows you to manage your devices and interact with the platform. Here's how you do it:
- Navigate to the Yggio login page. The URL should have been provided to you by the Yggio Admin.
- Enter your credentials in the appropriate fields.
- Click the "Sign In" button.
VII. Starting the Swagger Application for API Communication
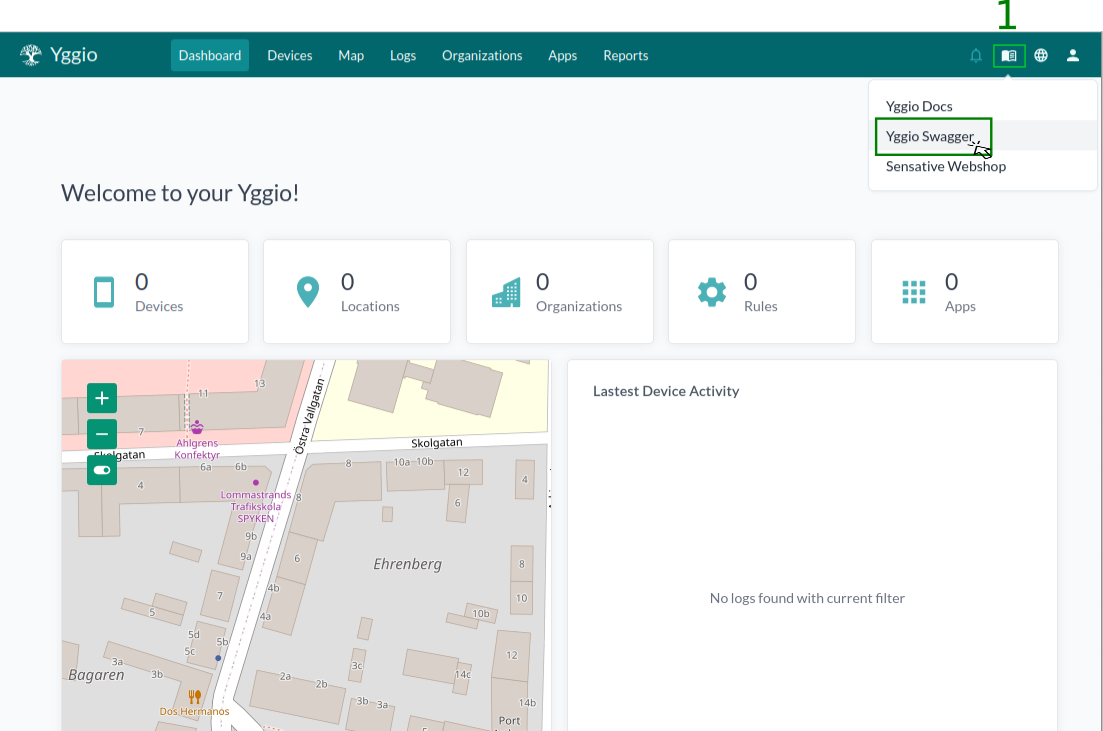
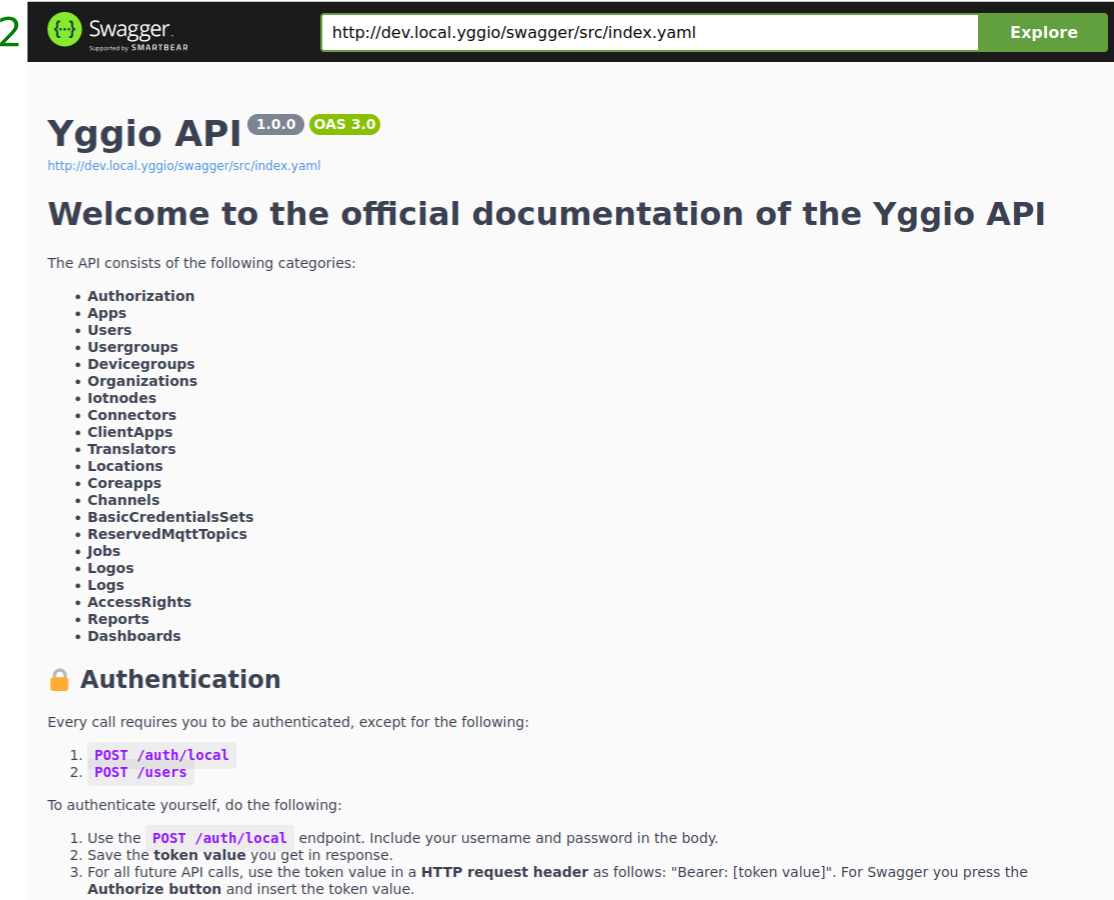
In this section, we'll start the Swagger application. Swagger is a tool that helps you communicate with the Yggio platform using its API. Here's how you do it:
- Once logged into Yggio, navigate to the Swagger application.
- You should now see the Swagger interface. This is where you can interact with the Yggio API.
VIII. Authorizing the Yggio Platform
In this section, we'll make sure that Yggio knows who you are and that you have permission to use it. This is called 'authorizing'. Here's how you do it:
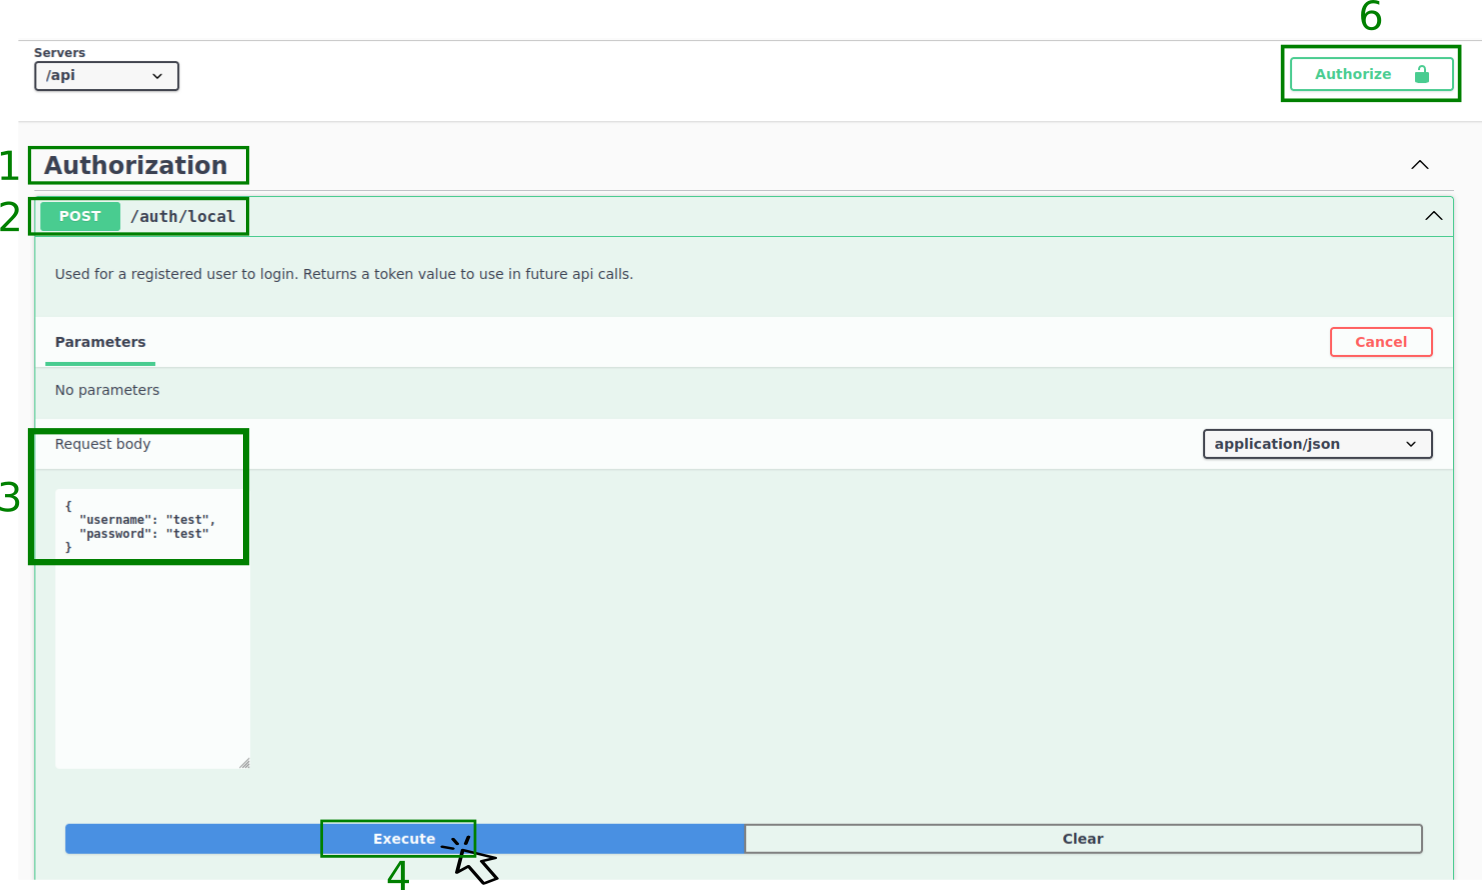
- Navigate to the Authorization section in the Swagger application page.
- Click on the
POST/auth/localdropdown, then click on the Try it out button. - In the Request body section, replace the placeholders marked as
"string"with your actual login details. These placeholders are located in the fields labeled"username"and"password". - Click the Execute button to complete the authorization.
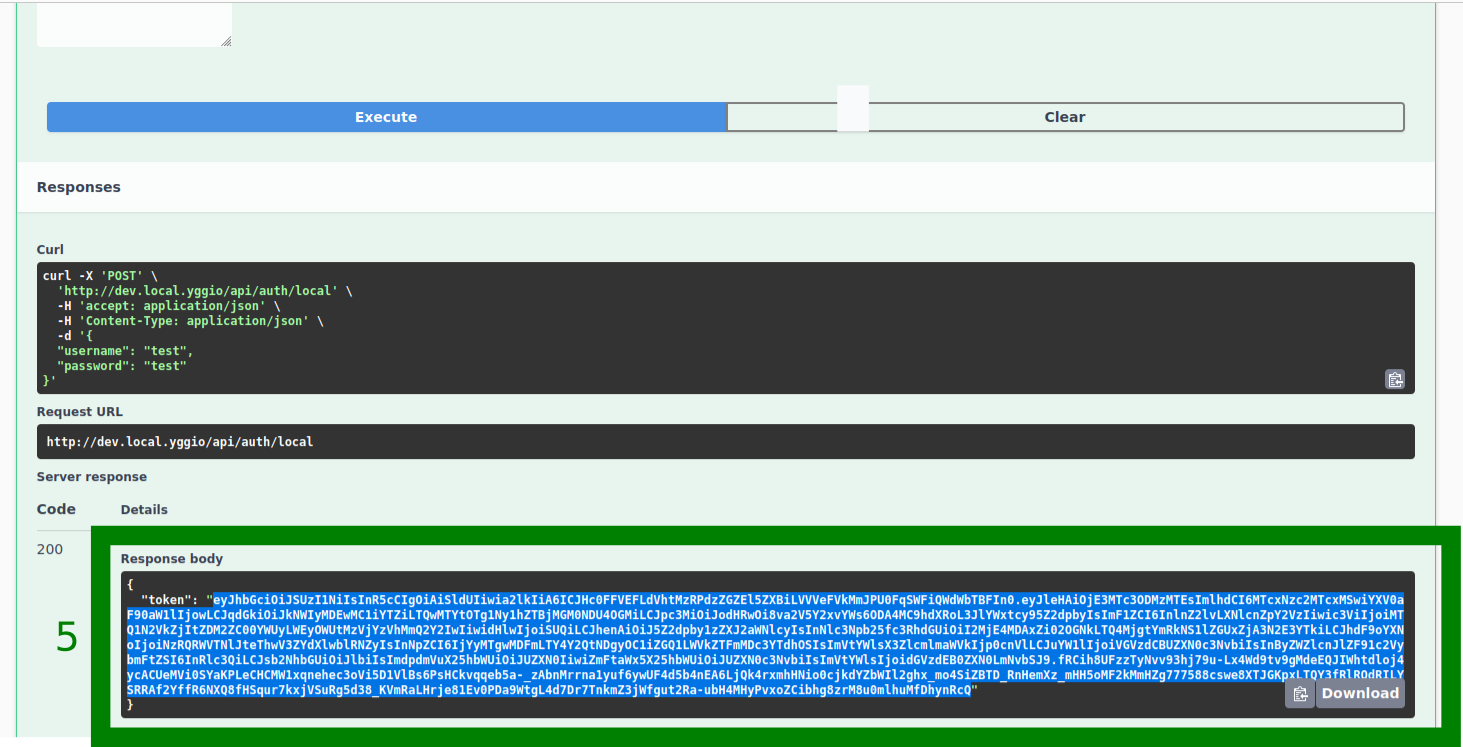
- You'll see a token (a long string of letters and numbers) in the response. Select this token and copy it. You'll need it later.
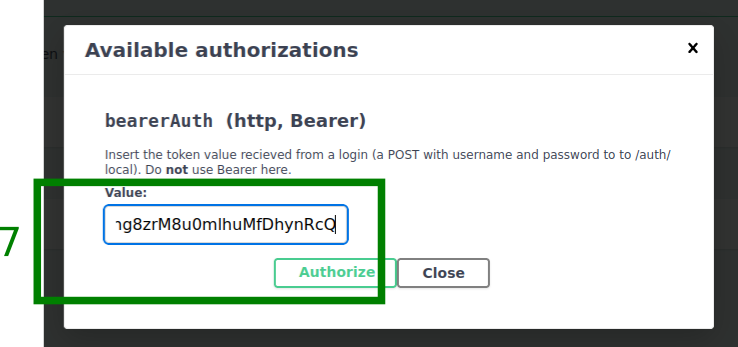
- Click on the Authorize button and a
Available authorizationsdialog will pop up. - Paste the token in the value field and click the Authorize button.
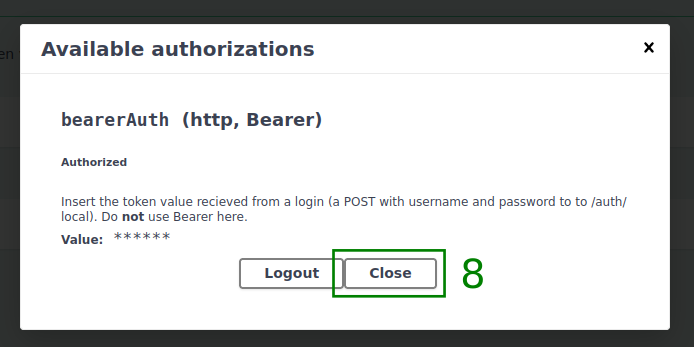
- Click Close to close the
Available authorizationsdialog.
Authorization response...
IX. Create a Basic Set Credentials ID
The next step is to create a Basic Set Credentials ID. This ID is used for authentication and ensuring the integrity of MQTT topics.
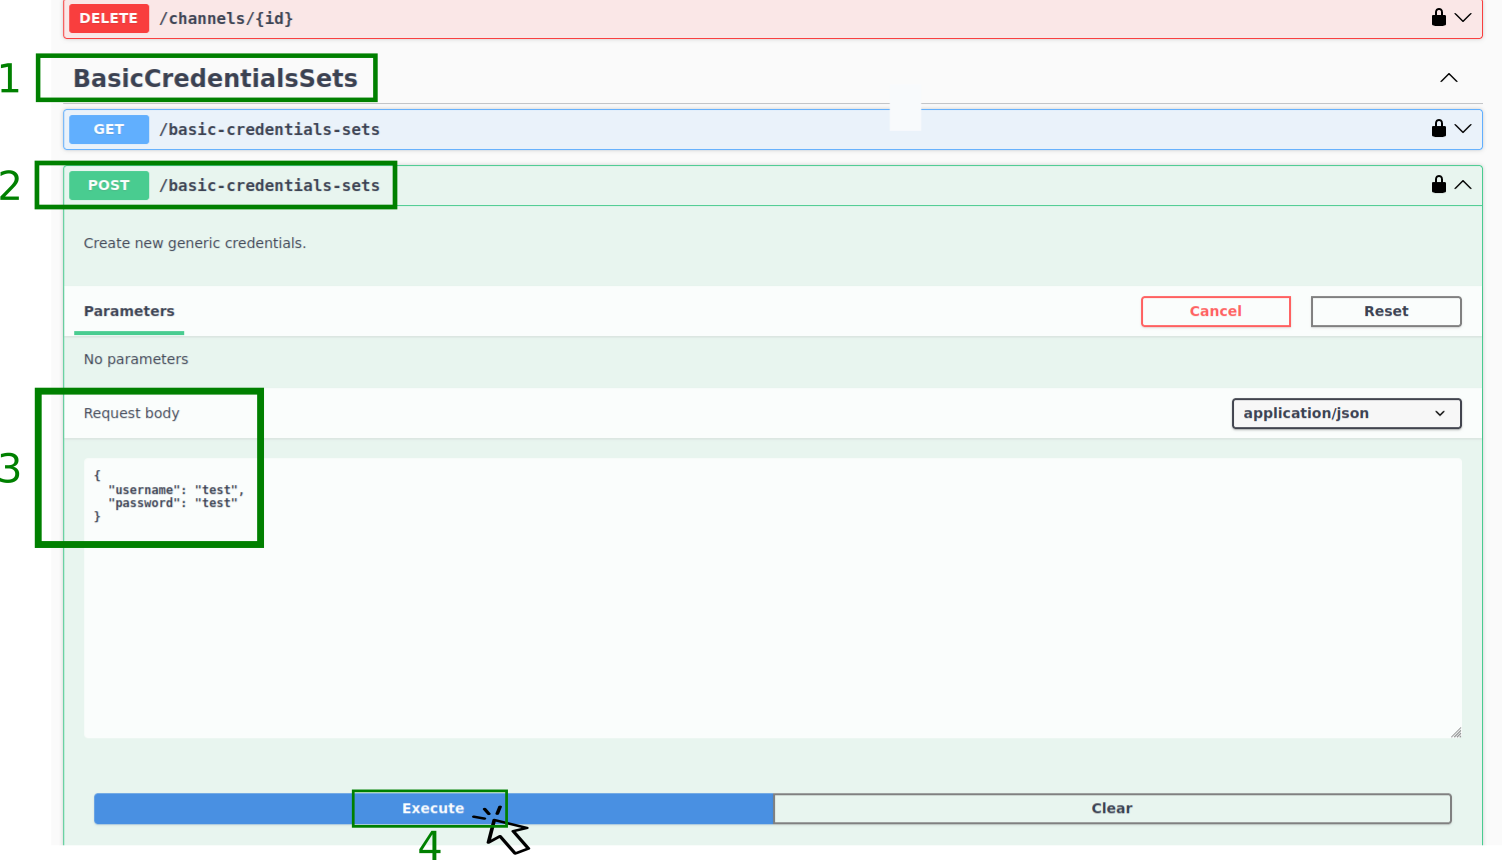
- Navigate to the BasicCredentialsSets section in the Swagger application page.
- Click on the
POST/basic-credentials-setsdropdown, then click on the Try it out button. - In the Request body section, replace the placeholders marked as
"string"with your Yggio login details or a new set of credentials as per your wish. These placeholders are located in the fields labeled"username"and"password". Make a note of the new credentials as these will be needed for configuring the Yggio MQTT Broker Username and Yggio MQTT Broker Password. For more details on this configuration, refer to the section IV. Create and Configure the Virtual Device. - Click the Execute button. This will generate a Basic credentials sets Id.
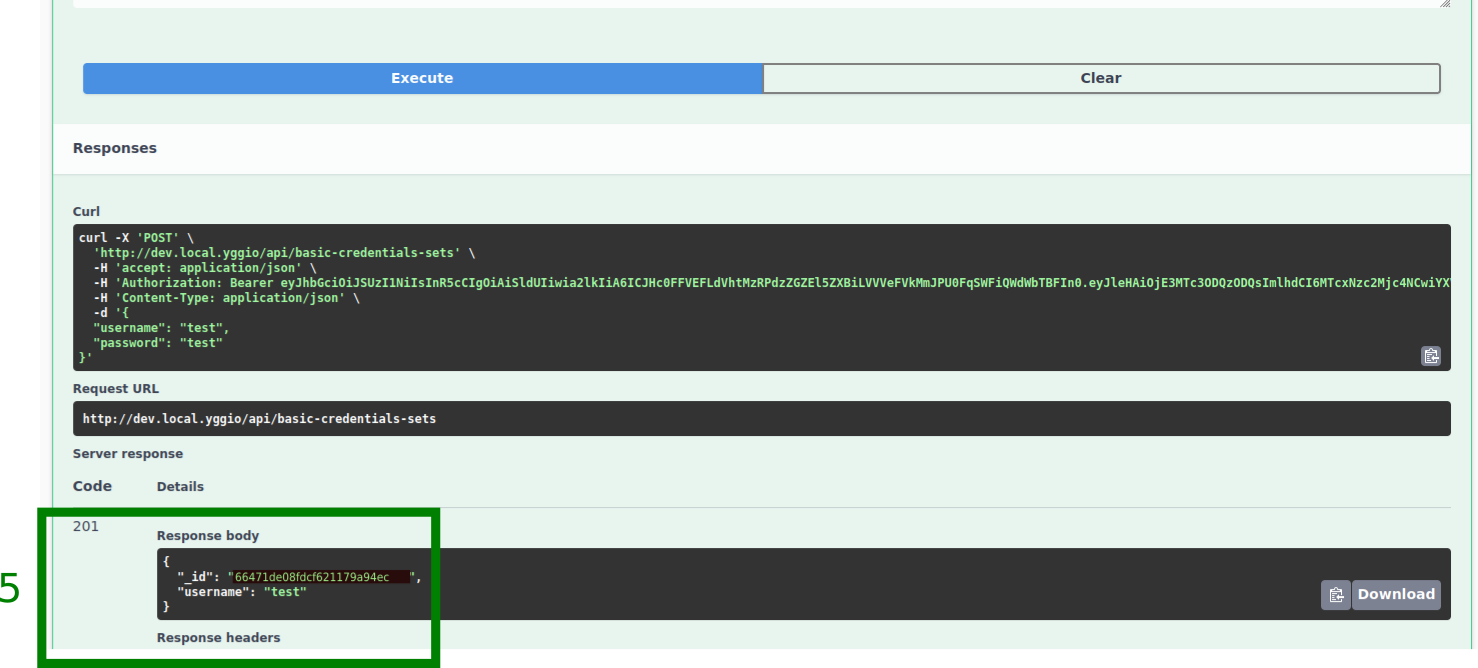
- In the Response body section, you will see an
_idand yourusername. Save the_idas you will need it for later steps and for configuring the Yggio MQTT Broker Basic Credentials ID. For more details on this configuration, refer to the section IV. Create and Configure the Virtual Device.
BasicCredentialsSets response...
X. Establishing a Reserved MQTT Topic
The next step is to create a reserved MQTT topic. This topic is used as a prefix and comprises of the Yggio - Hubitat integration version and the Basic credentials sets Id created earlier.
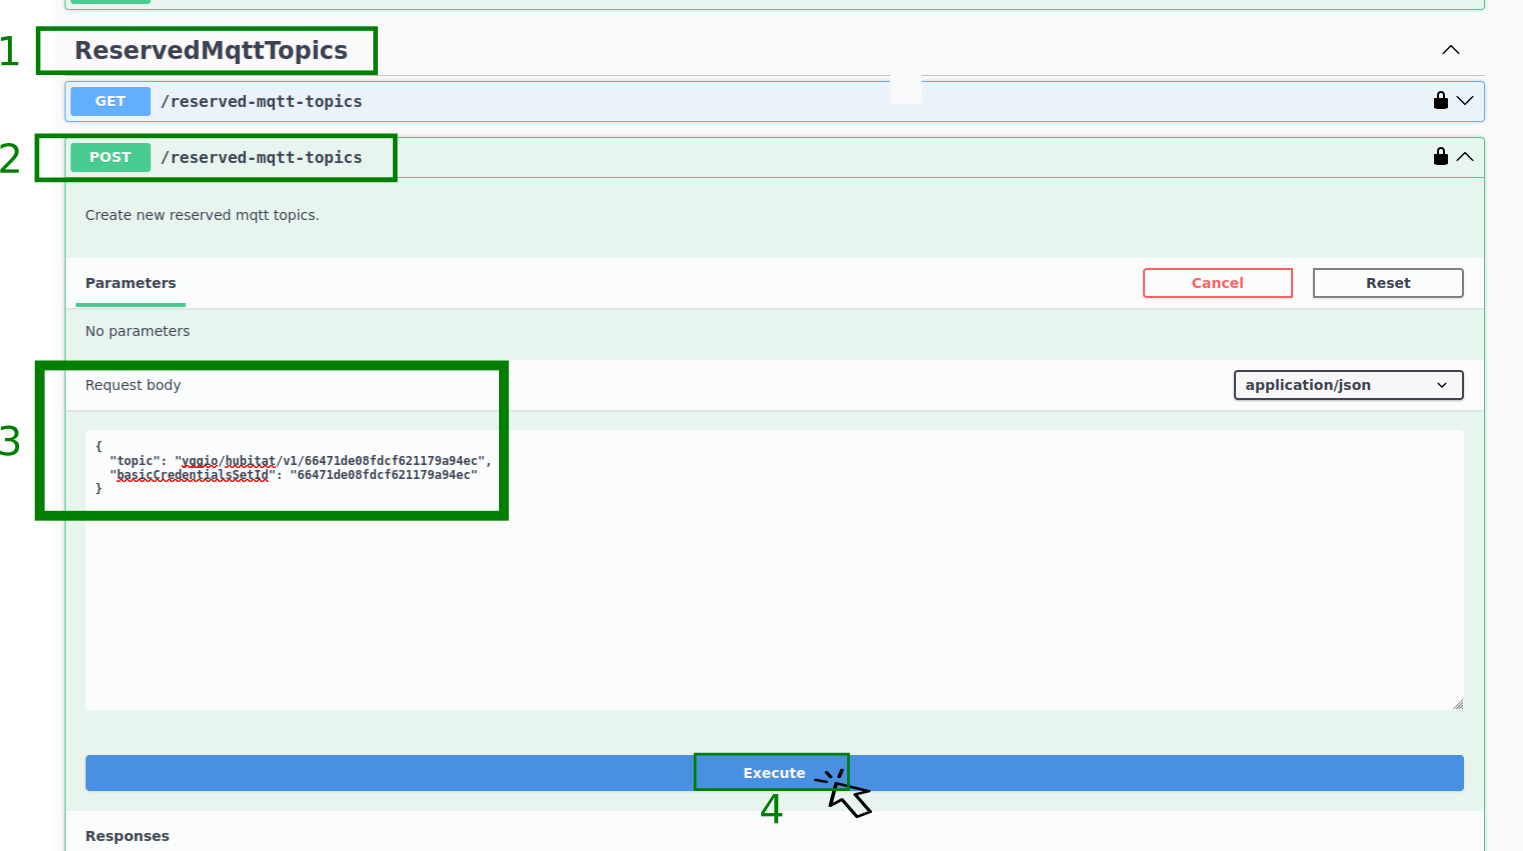
- Navigate to the ReservedMqttTopics section in the Swagger application page.
- Click on the
POST/reserved-mqtt-topicsdropdown, then click on the Try it out button. - In the Request body section, replace the placeholders marked as
"string":- For the field labeled
"topic", replace the"string"with"yggio/hubitat/v1/<your BasicCredentialsSets _id>"(replace<your BasicCredentialsSets _id>with the actual_idyou copied earlier). - For the field labeled
"basicCredentialsSetId", replace the"string"with your actual BasicCredentialsSets_idthat you copied when creating the BasicCredentialsSets Id.
- For the field labeled
- Click the Execute button.
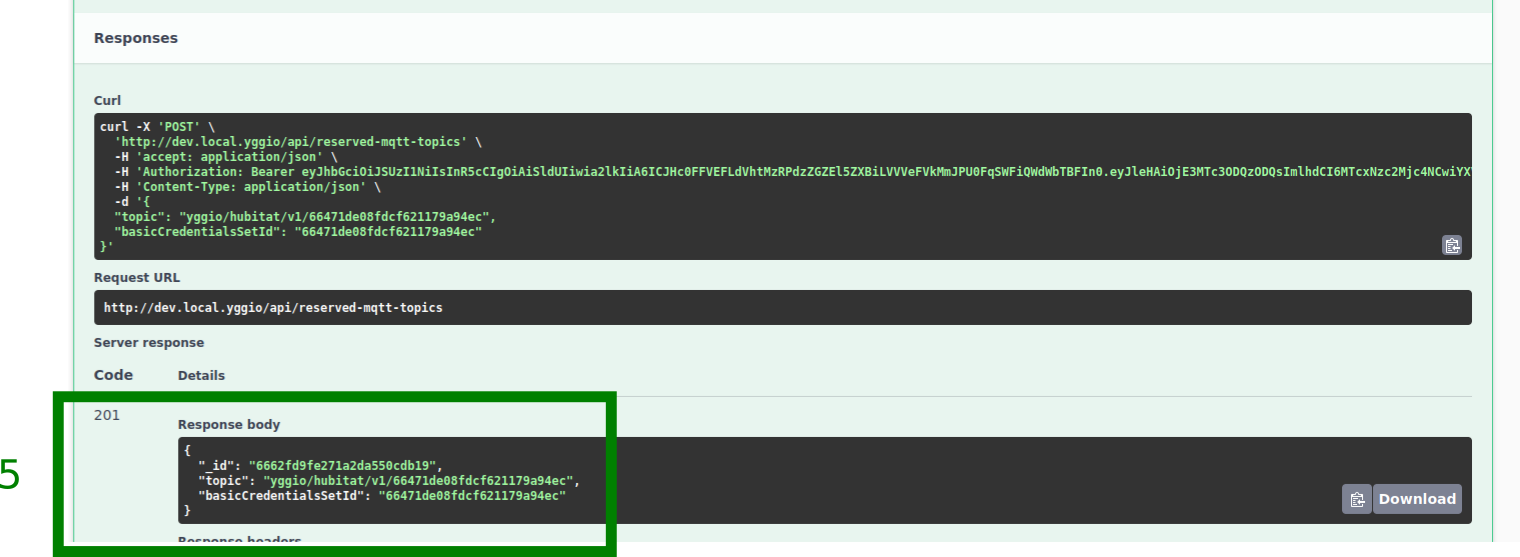
- The Response body section will confirm if the Reserved MQTT Topic is created successfully.
Template:
{
   "topic": "yggio/hubitat/v1/<Replace with the basicCredentialsSetId>",
   "basicCredentialsSetId": "Replace with the basicCredentialsSetId"
}
ReservedMqttTopics response...
XI. Create a Hubitat Connector
The next step is to create the Hubitat Connector which is the crucial component of the integration.
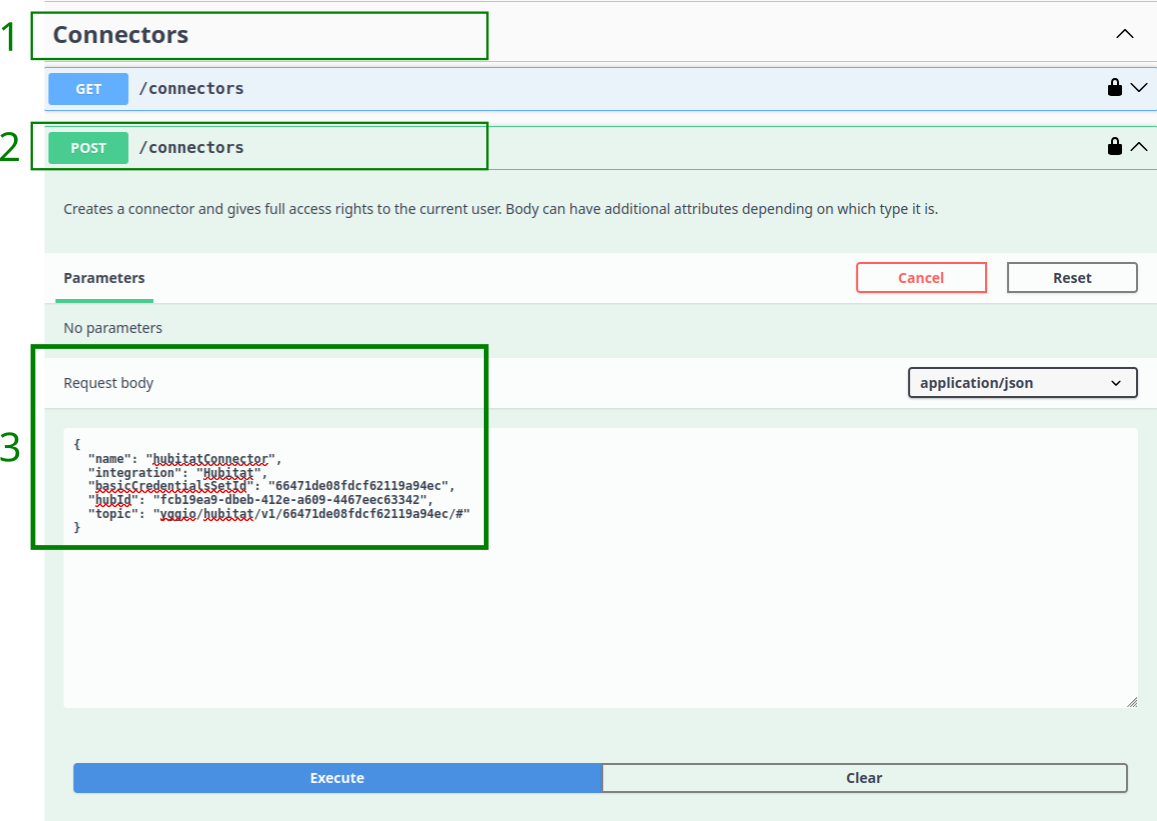
- Navigate to the Connectors section in the Swagger application page.
- Click on the
POST/connectorsdropdown, then click on the Try it out button. - In the Request body section, replace the placeholders marked as
"string".- For the field labeled
"name", replace the"string"with a name of your wish. - For the field labeled
"integration", replace the"string"with"Hubitat". Make sure the spelling is correct. - For the field labeled
"basicCredentialsSetId", replace the"string"with your actual BasicCredentialsSets_idthat you copied when creating the BasicCredentialsSets Id. - For the field labeled
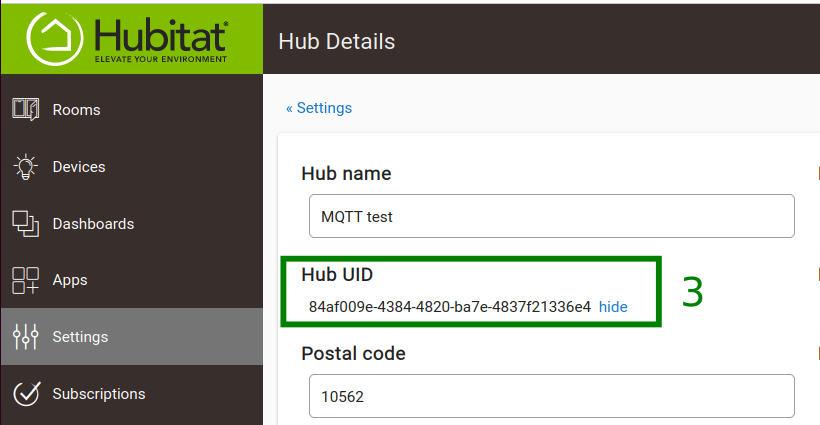
"hubId", replace the"string"with the Hub UID. Hub UID could be found in Hubitat's user interface settings as shown in the accompanying images below. - For the field labeled
"topic", replace the"string"with"yggio/hubitat/v1/<your BasicCredentialsSets _id>/#"(replace<your BasicCredentialsSets _id>with the actual_idyou copied earlier).
- For the field labeled
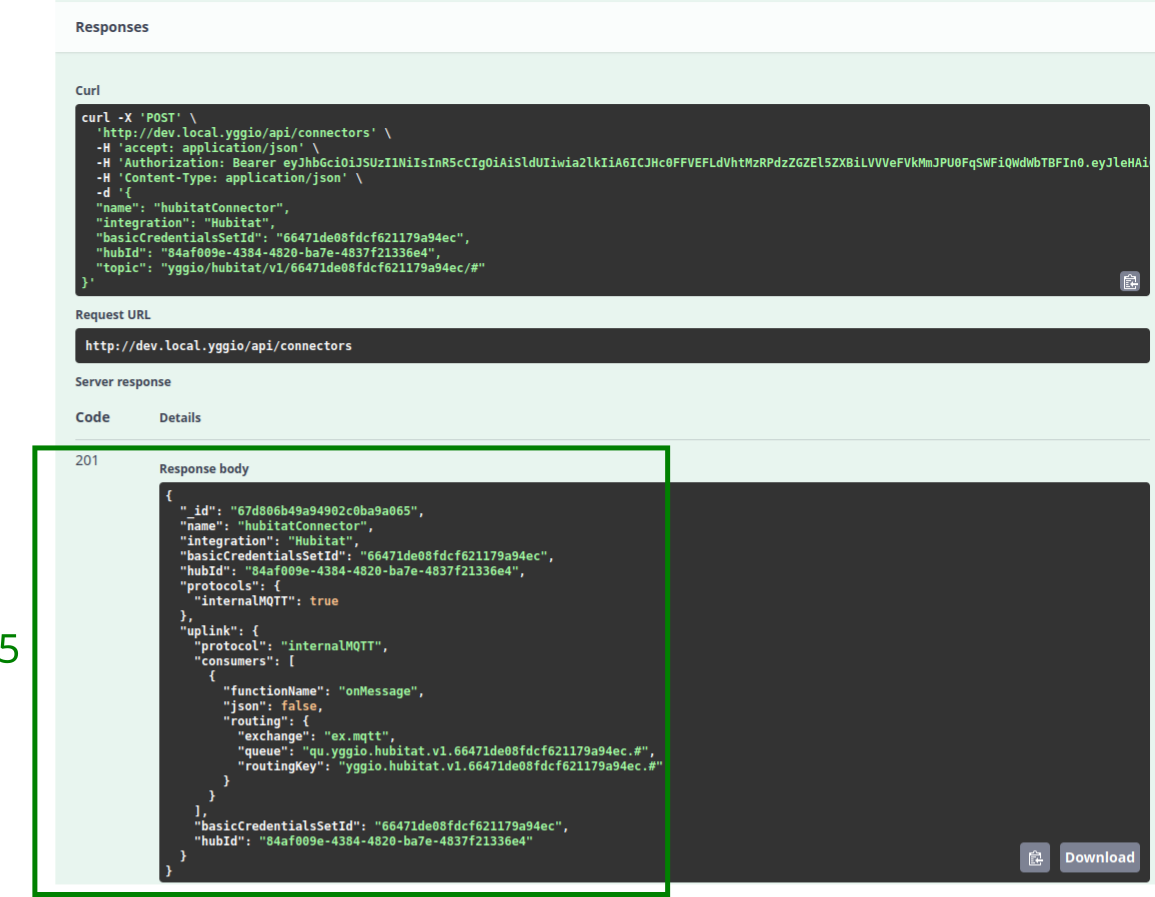
- Click the Execute button.
- The Response body section will confirm if the Connector is created successfully.
- Save the Connector
_idfor use in Downlink Communication. Note: This step will no longer be necessary once Yggio frontend support is implemented.
Template:
{
   "name": "<Add a name>",
   "integration": "Hubitat",
   "basicCredentialsSetId": "Replace with the basicCredentialsSetId",
   "hubId": "Replace with the hubId",
   "topic": "yggio/hubitat/v1/<Replace with the basicCredentialsSetId>/#"
}

Add Connectors response...
XII. Populating Preferences in Hubitat with Credentials
Once you have your credentials from the Yggio Admin or from completing sections VI to IX, you can populate the preferences in Hubitat. This will allow Hubitat to communicate with the Yggio platform. Follow the steps in the Create and Configure the Virtual Device section to do this.
XIII. Claiming IoT Nodes: A Work in Progress
To Be Updated(...Not sure how it was done...Swagger Claim nodes seems to be locked)!
XIV. Yggio Dashboard - Viewing Hubitat Devices
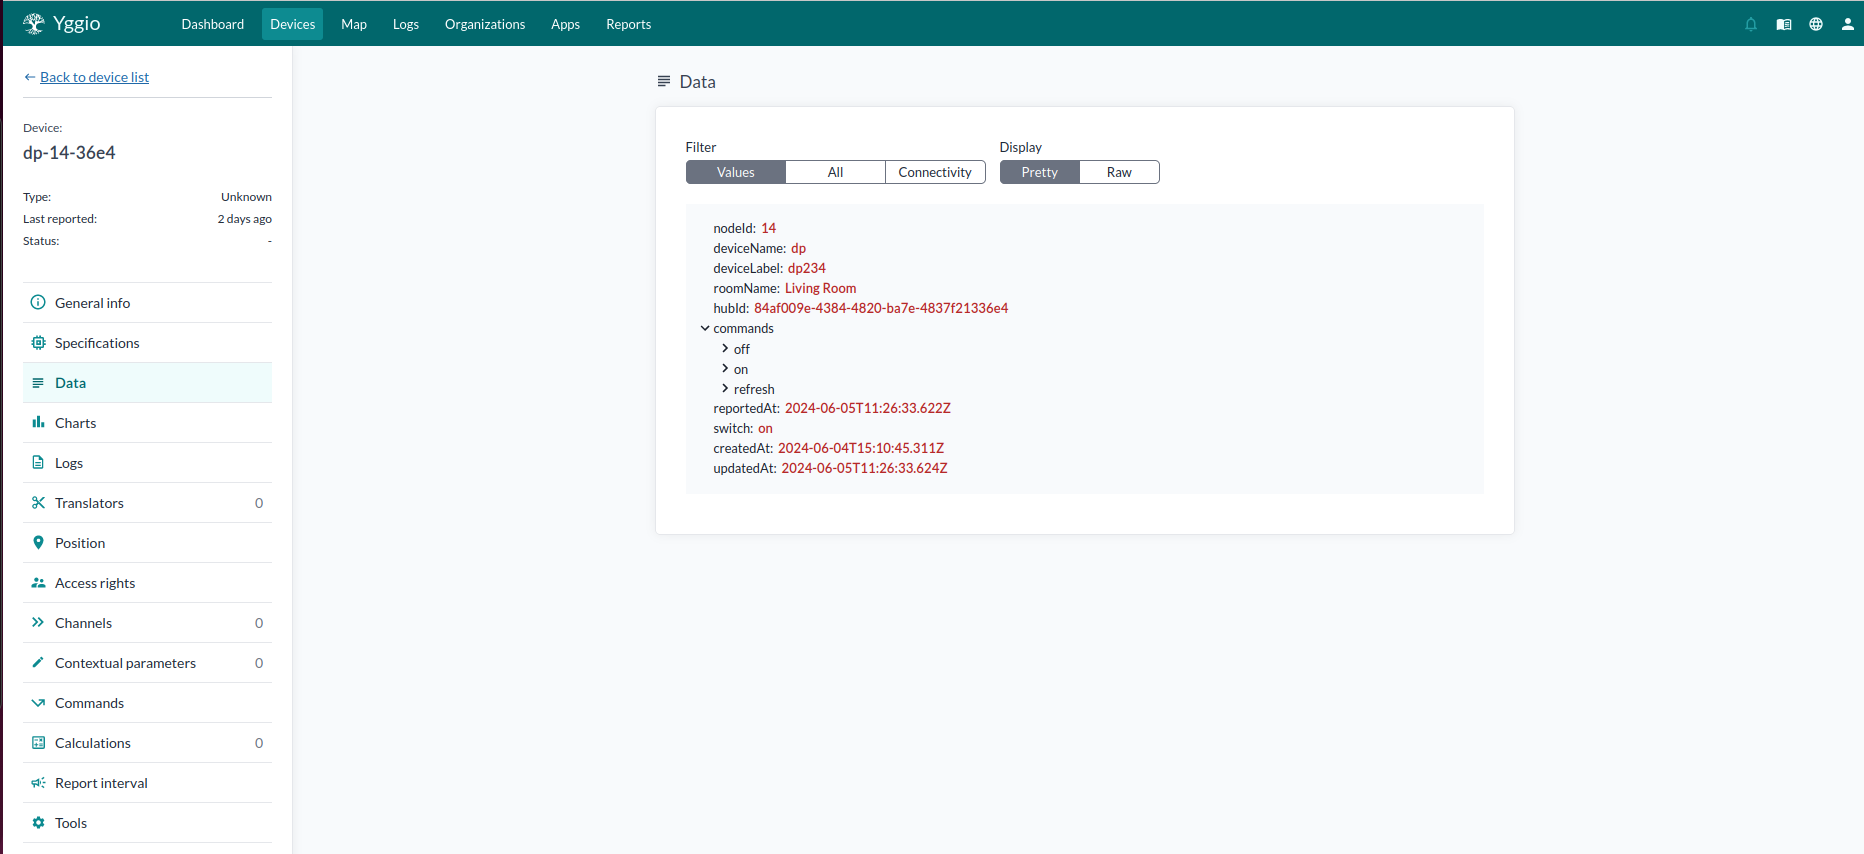
After completing the previous steps and successfully syncing your Hubitat devices with Yggio using MQTT communication, you can view your Hubitat devices on the Yggio dashboard. This provides a convenient way to monitor and control your devices.
The first image below shows the Yggio dashboard with the devices that were synced from the Hubitat hub. The second image provides a detailed view of the data for a virtual Z-Wave switch device, showing the current state of the switch as 'on'.

XV. Uplink Communication - Example
Uplink communication refers to the communication from Hubitat to Yggio. An example of this would be a device status update from Hubitat being sent to Yggio.
The two images below illustrate this uplink communication. The first image shows the status update when the 'on' button is clicked on the virtual Z-Wave Switch device in the Hubitat interface. This action is reflected in the same device's data on the Yggio side. The second image shows a similar update when the 'off' button is clicked on the virtual Z-Wave Switch device in the Hubitat interface, and how this change is reflected on the Yggio side.


XVI. Downlink Communication - Example
Downlink communication refers to the communication from Yggio to Hubitat. An example of this would be a command from Yggio being sent to a device on Hubitat.
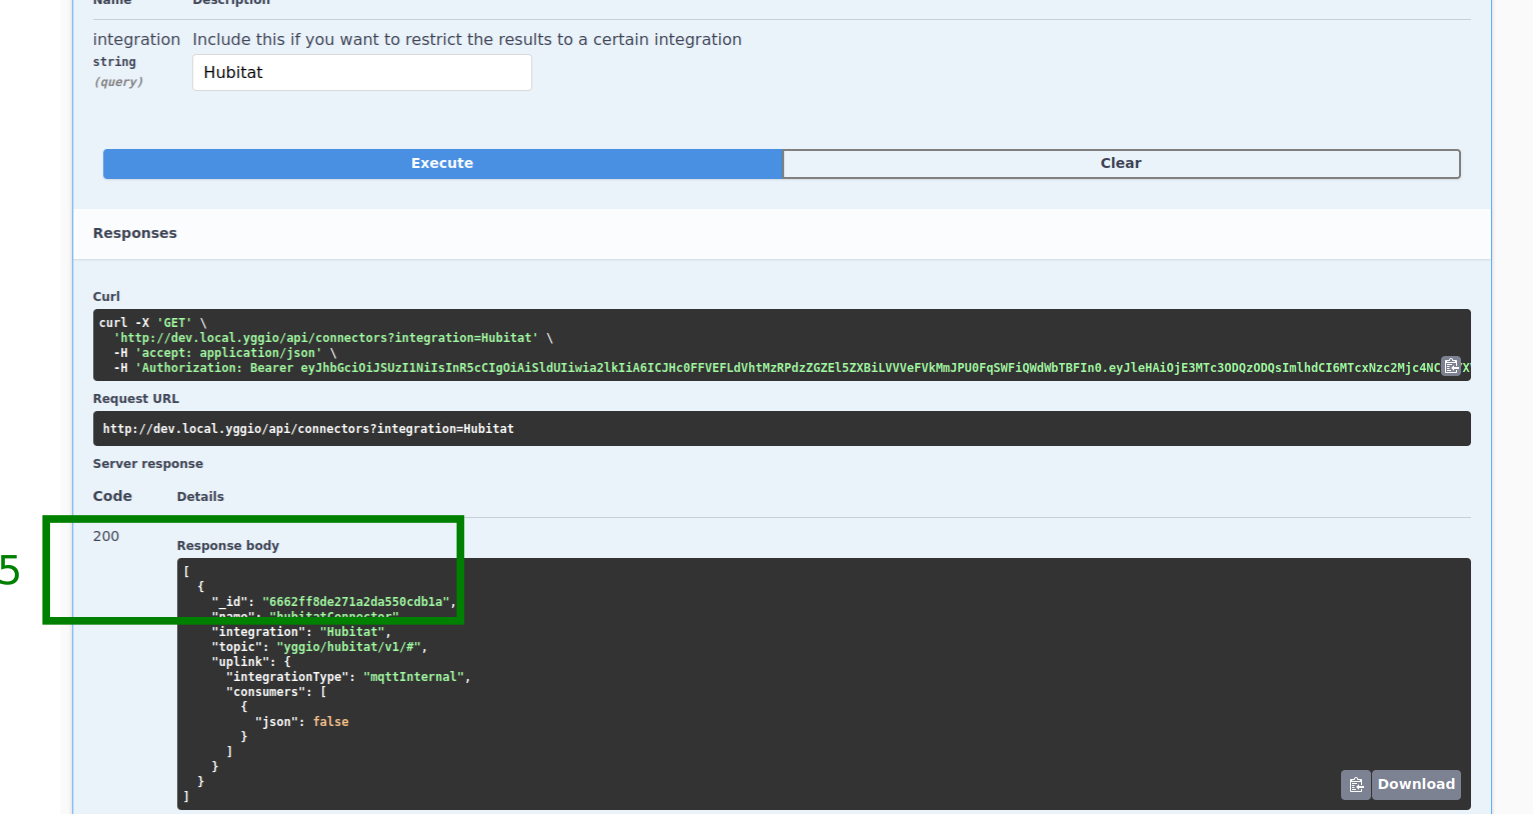
The first two images below illustrate how to retrieve the connector Id from the Connectors section in the Swagger application. This might be necessary if you did not copy it in section XI. Create a Hubitat Connector step 6, or if you have lost the connector Id. To do this, you need to
-
Navigate to the Connectors section in the Swagger application page.
-
Click on the
GET/connectorsdropdown, then click on the Try it out button. -
In the Request body section, replace the placeholders marked as
"string"with"Hubitat"in theintegrationfield. -
Click the Execute button.
-
From the Response body section, if successful, copy the Connector _id and save it for sending downlink commands.
-
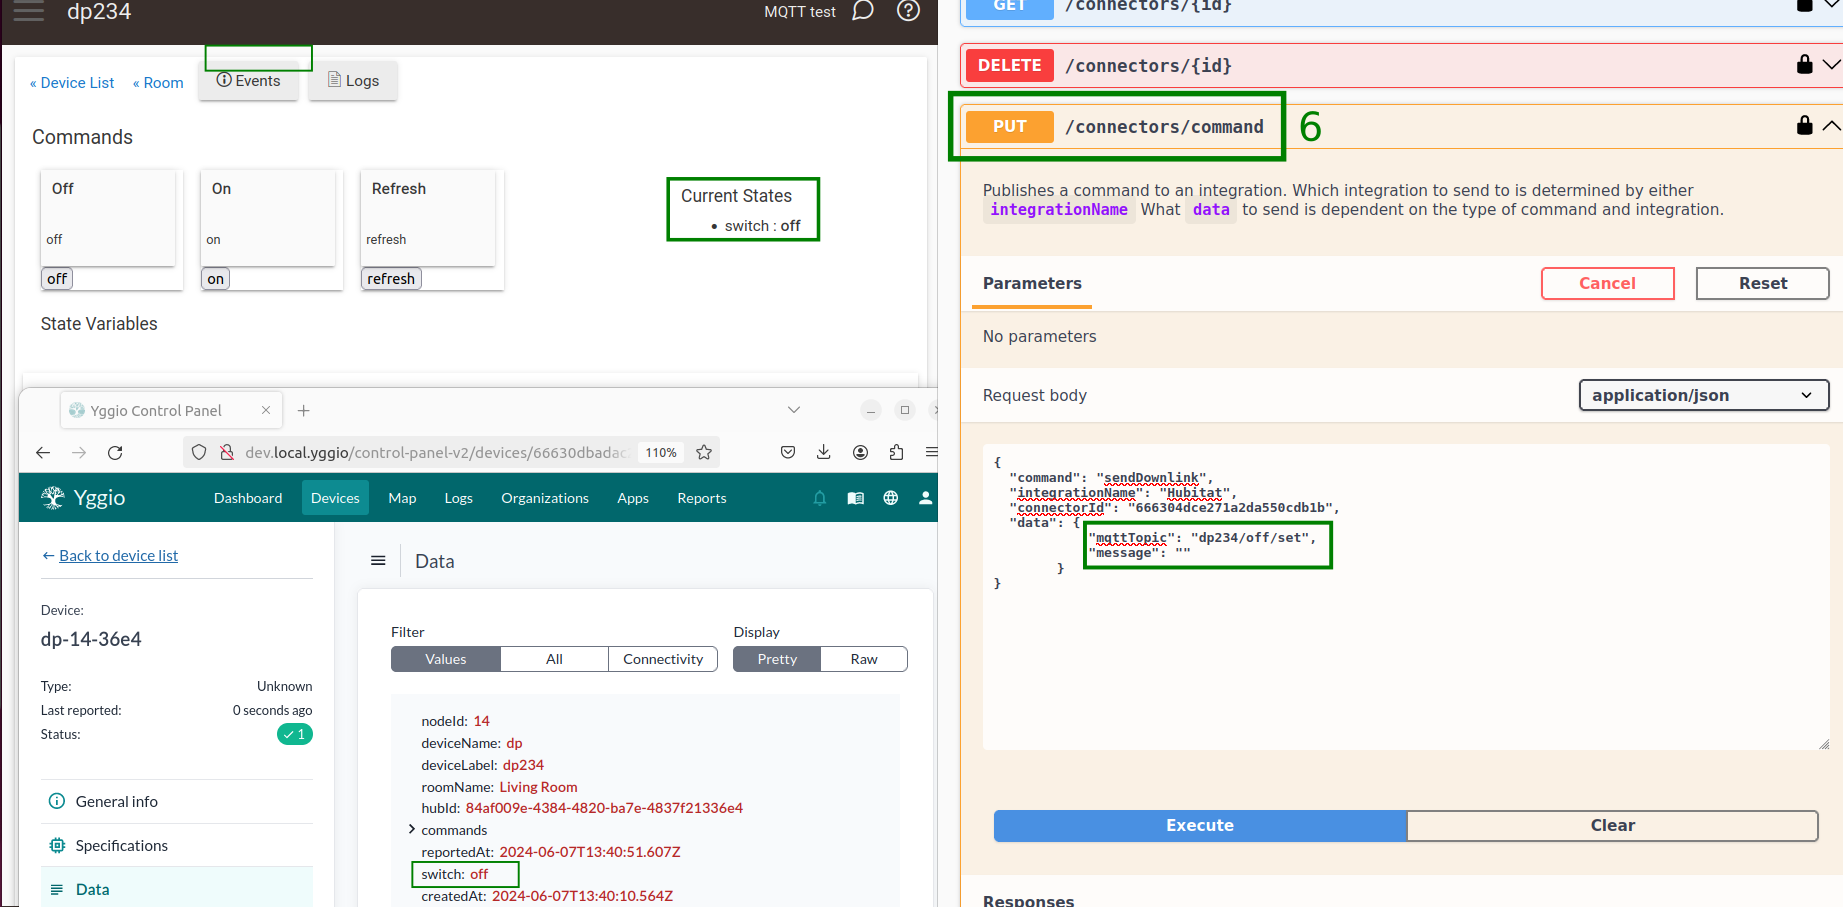
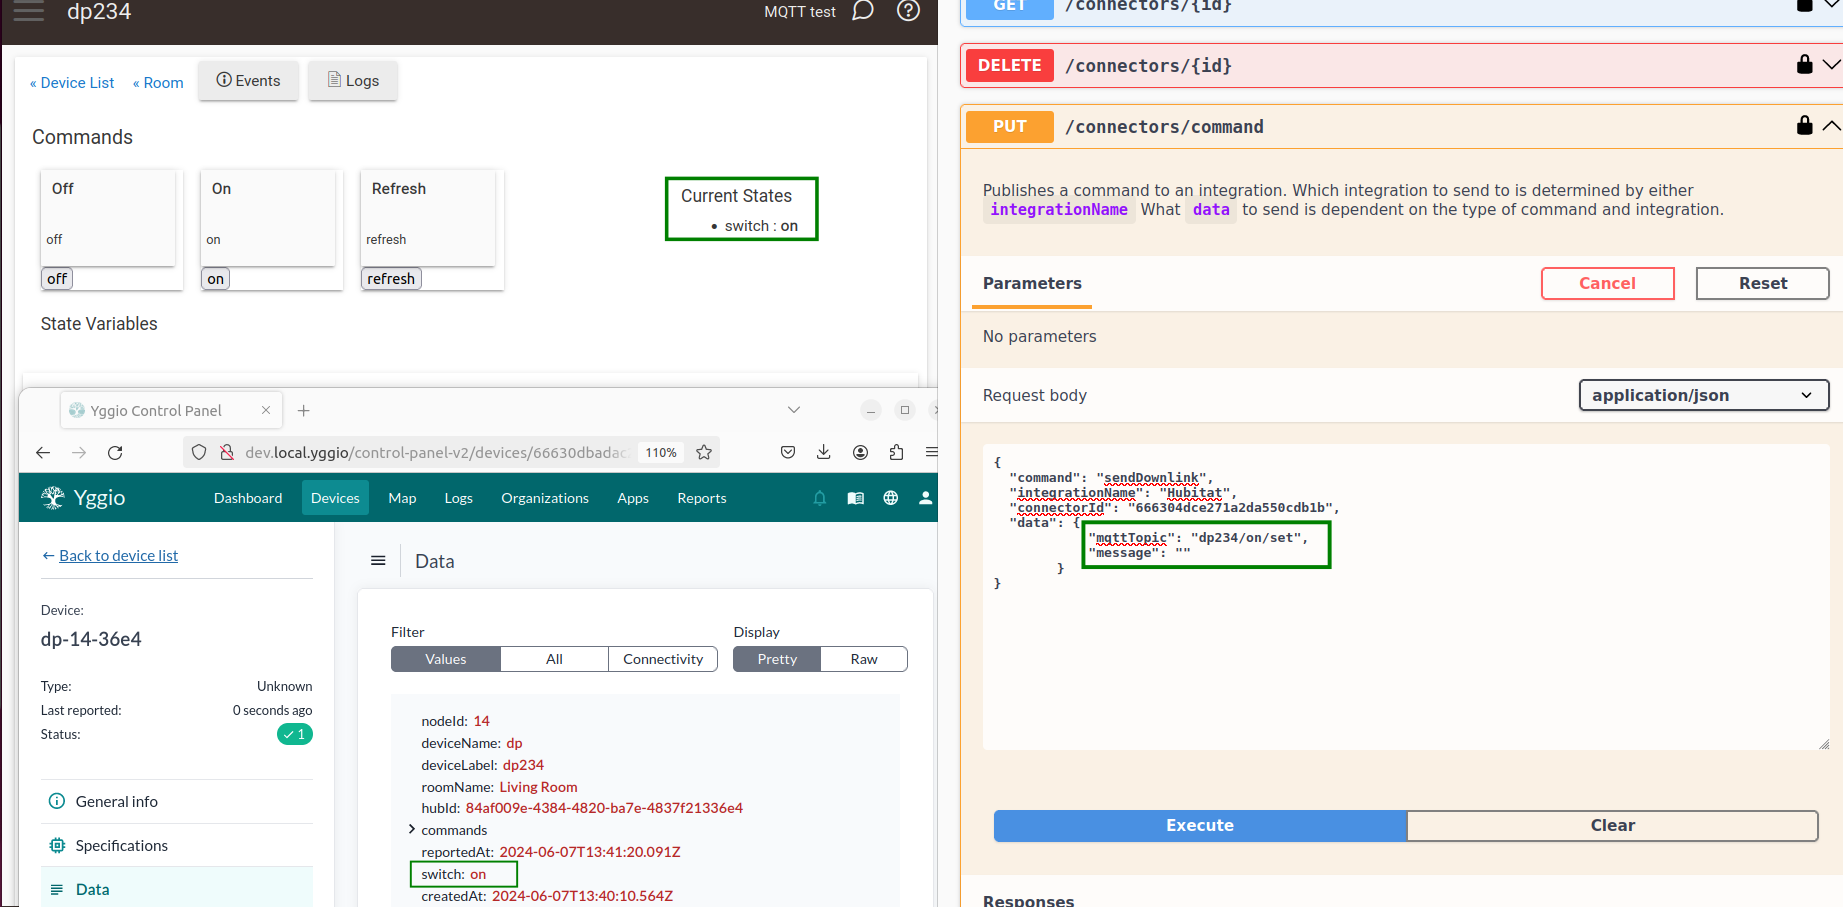
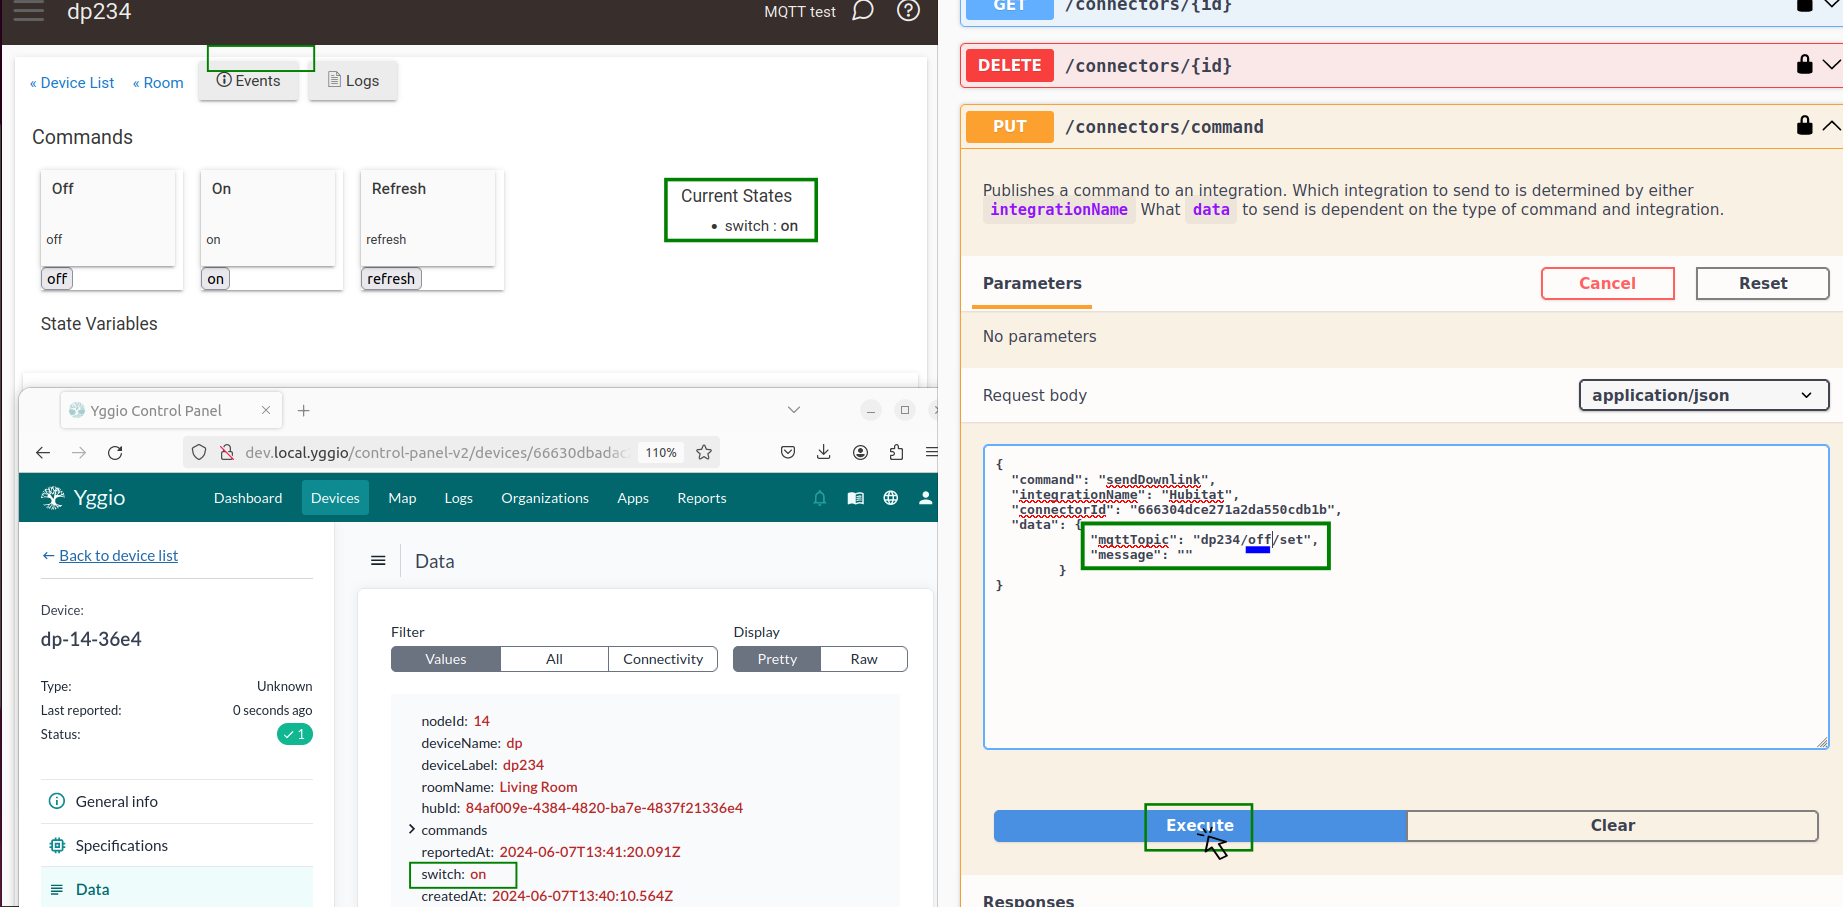
The image marked '6' shows the current state of the virtual Z-Wave switch device on the Hubitat and Yggio side. In the Swagger application, you can set up the downlink command in the
PUT/connectors/commandsection. Here's how:- For the field labeled
"command", the"string"is replaced with"sendDownlink"command. - For the field labeled
"integrationName", replace the"string"with"Hubitat". - For the field labeled
"connectorId", replace the"string"with your actual Connector_idthat you copied when creating the Hubitat Connector or following the steps 1 to 5 in this section. - For the field labeled
"data", add the following JSON.
"data": {
   "mqttTopic": "dp234/off/set",
   "message": ""
}
where
"mqttTopic"usually follows the format"[deviceLabel]/[command name]/set"and
"message"is the actual payload you want to send.Notes for the payload
Note 1: For commands that do not require parameters (like 'on' and 'off'), you can publish anything as the value for the /set topic. The Sensative Yggio MQTT App ignores this value.
Note 2: For commands that require multiple parameters, you should separate each parameter with a comma. For example, '80, 25'.
- For the field labeled
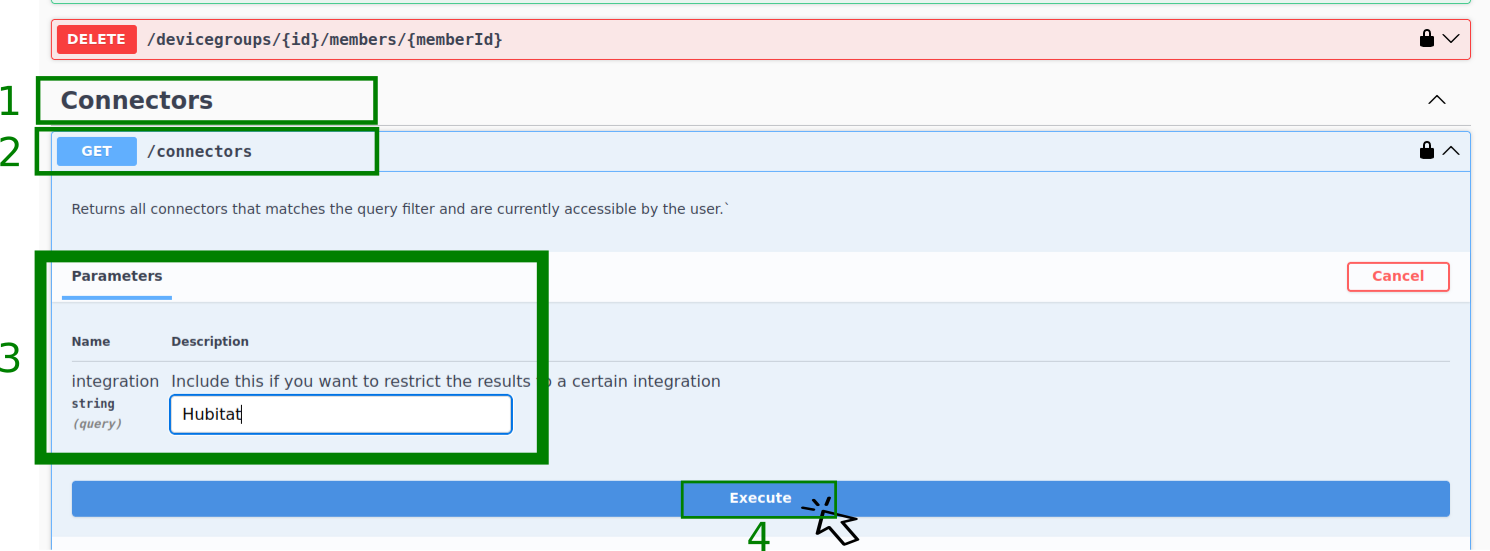
Get Connectors response...
The image below shows the current 'off' state of the virtual Z-Wave Switch in both Hubitat and Yggio.
Send 'on' state downlink command from the Swagger application.
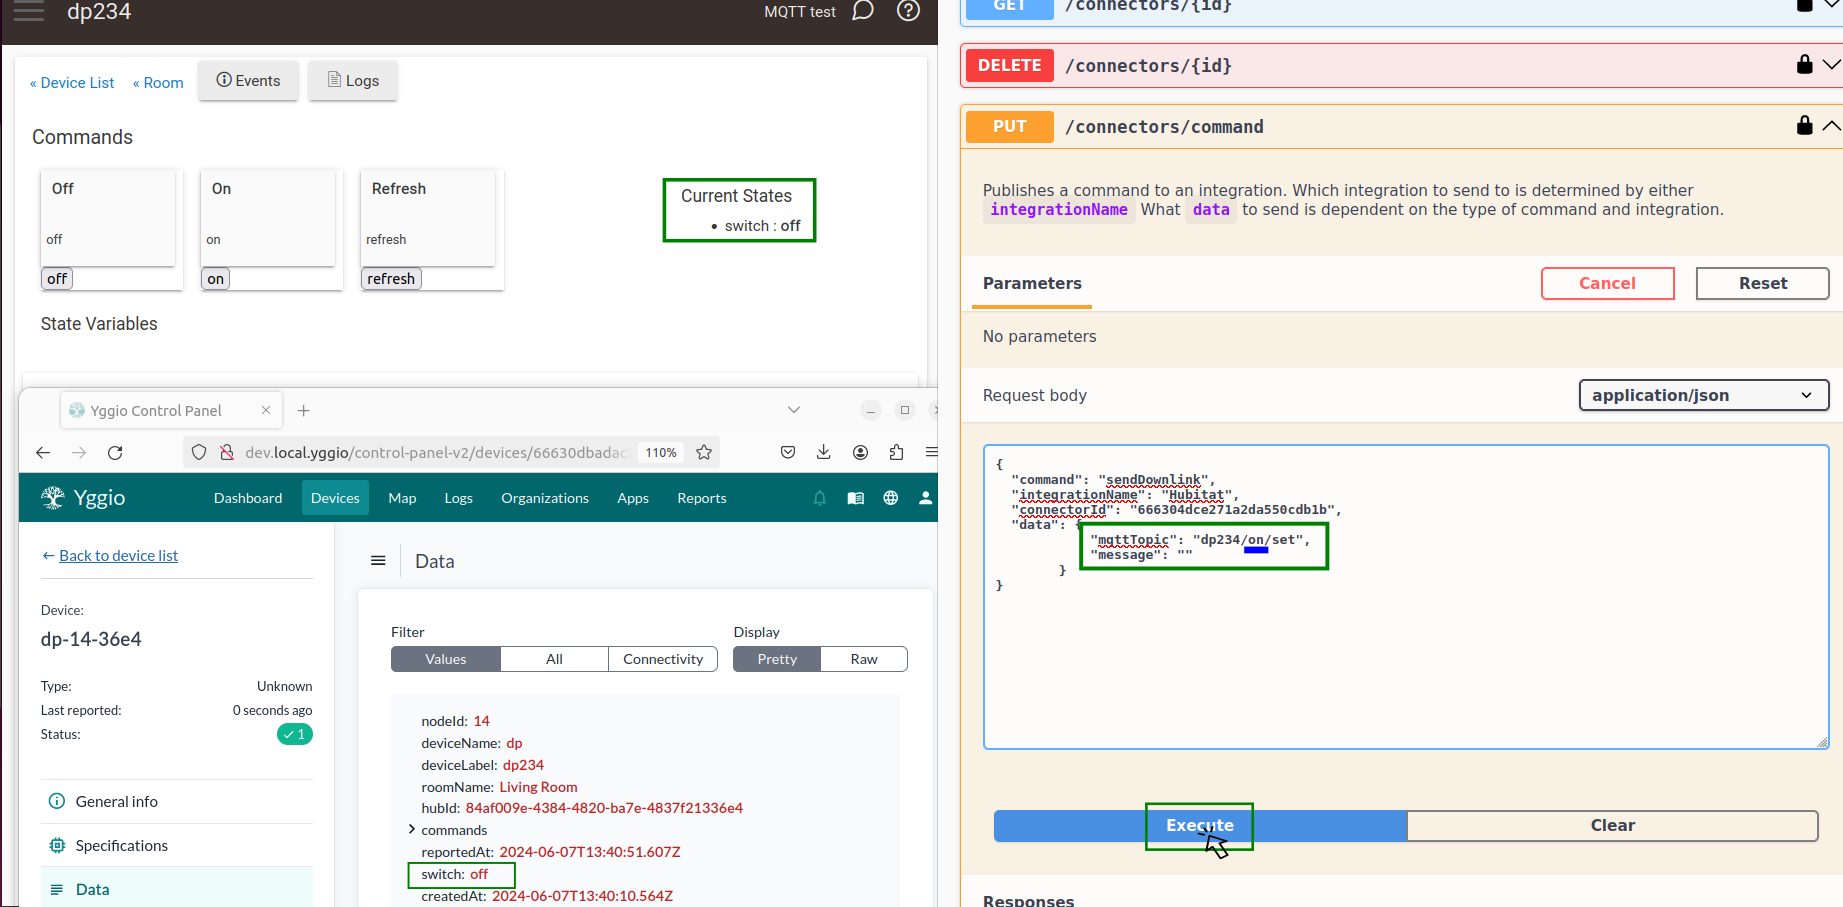
New state - 'on' of the virtual Z-Wave Switch reflected in Hubitat and Yggio.
Send 'off' state downlink command from the Swagger application.
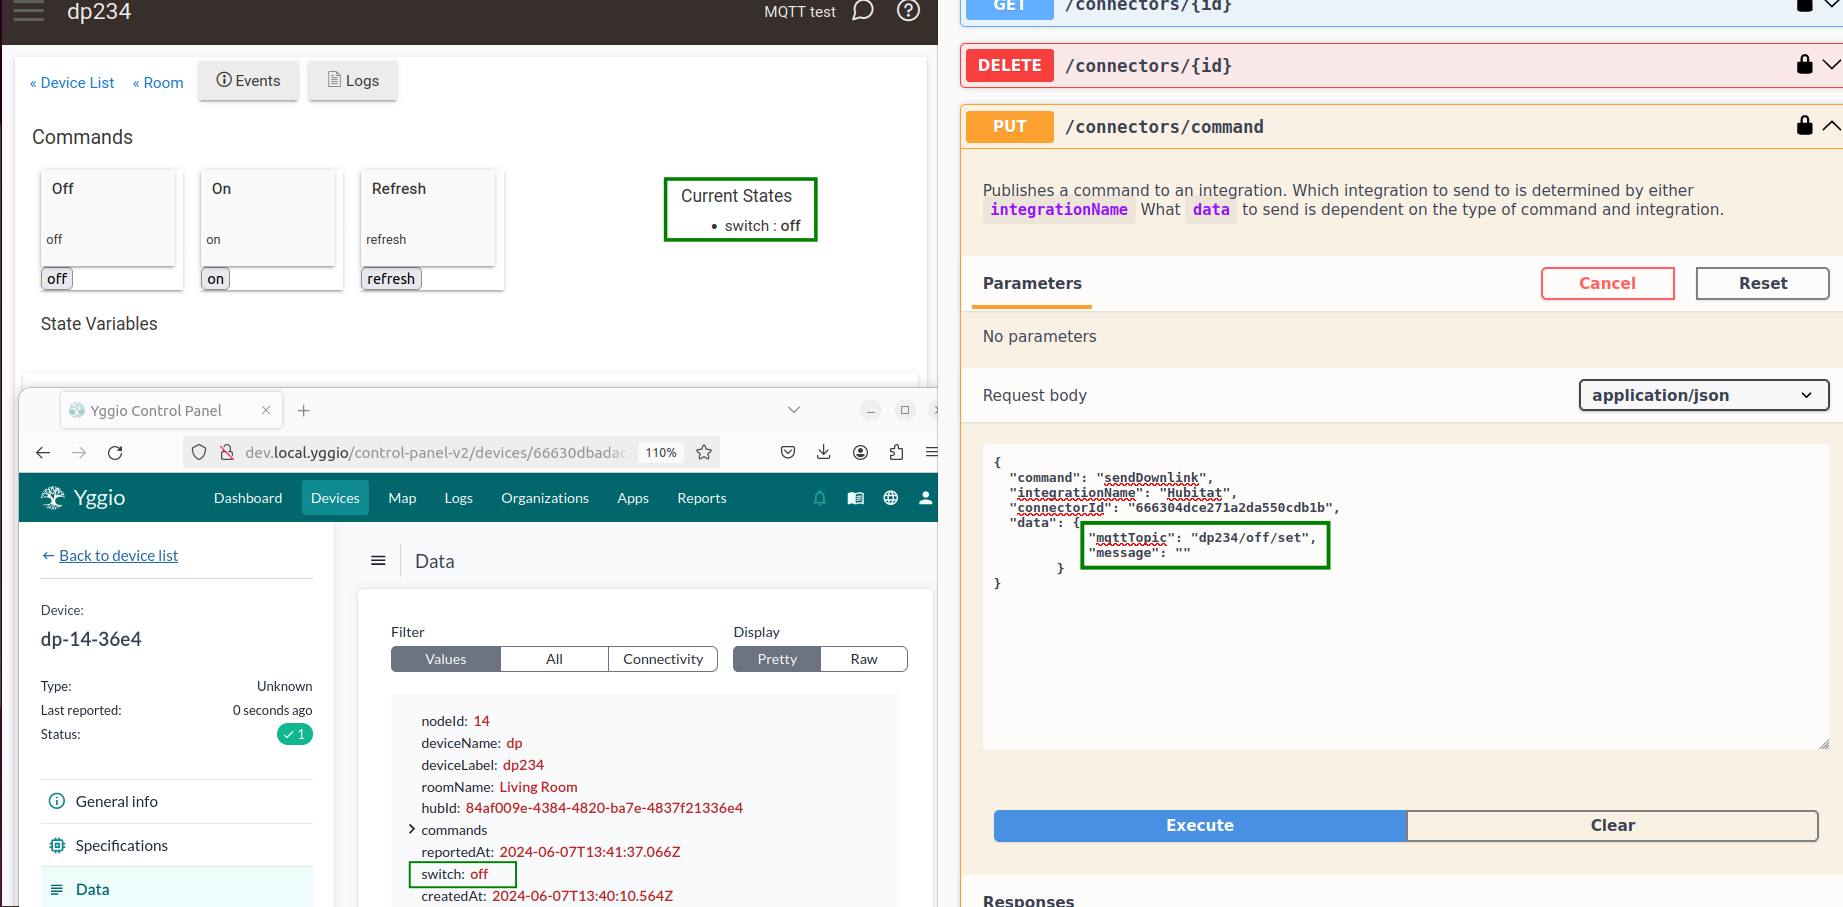
New state - 'off' of the virtual Z-Wave Switch reflected in Hubitat and Yggio.
In this guide, we have walked you through the process of integrating Hubitat with the Yggio platform using MQTT communication. We started by setting up the MQTT broker and configuring the MQTT Bridge app in Hubitat. We then created a virtual device in Hubitat and configured it to communicate with Yggio.
We also discussed the concepts of uplink and downlink communication, with examples showing how device status updates and commands are sent between Hubitat and Yggio.
By following these steps, you should now have a fully functional integration between Hubitat and Yggio, allowing you to monitor and control your Hubitat devices from the Yggio dashboard.