Control Panel
Control Panel V2
Adding devices to Yggio
How to connect a LoRa device (Single mode)
-
Navigate to "Devices" from the menu bar at the top
-
Click on "New device" then "Single mode"
-
In the "Select device type..." drop down, choose LoRaWAN, then hit "Continue"
-
In the next step you are prompted to select a connector which is a link to a LoRa Network Server such as Chirpstack, TTN, Netmore etc. Select the connector that applies to your device
-
Once a connector has been chosen, a new drop down is introduced that allows you to select "Activation Type", "OTAA" or "ABP". Choose the type that applies to your device
-
Fields to enter device keys are now visible as well as other required information. Which fields are required in your case depends on the LoRa Network Server application
-
If you wish to decode your device's payload, select the mode name that is used for your device. This field can be left empty and changed later on
-
In the next step you can add additional translators, once you're done, hit "Continue"
-
The final step "Details" lets you set a name for your device, as well as a description. If you want to add your device to a specific Location (Location Manager), you can do so here. You can also add contextual parameters. When ready, click on "Add device"
-
The last page "Result" will let you know if your device was added successfully or if problems were encountered
How to connect a LoRa device (Batch mode)
-
Navigate to "Devices" from the menu bar at the top
-
Click on "New device" then "Batch mode"
-
Upload your csv batch file by dragging and dropping it onto the grey box or click on the grey box and select your file on your computer. If you need information on how to create a batch file, click on the link "What should I put in the file?"
-
When the file has been uploaded, you will be notified if the file is valid or not. If the file is valid, press "Continue" to proceed
-
In the next step, the amount of devices to be installed will be displayed, if the information is correct, click on "Start installation"
-
After the installation has finished, information about the result is shown. In case of errors, download the errors file to troubleshoot. To exit the Batch installer, hit "Done"
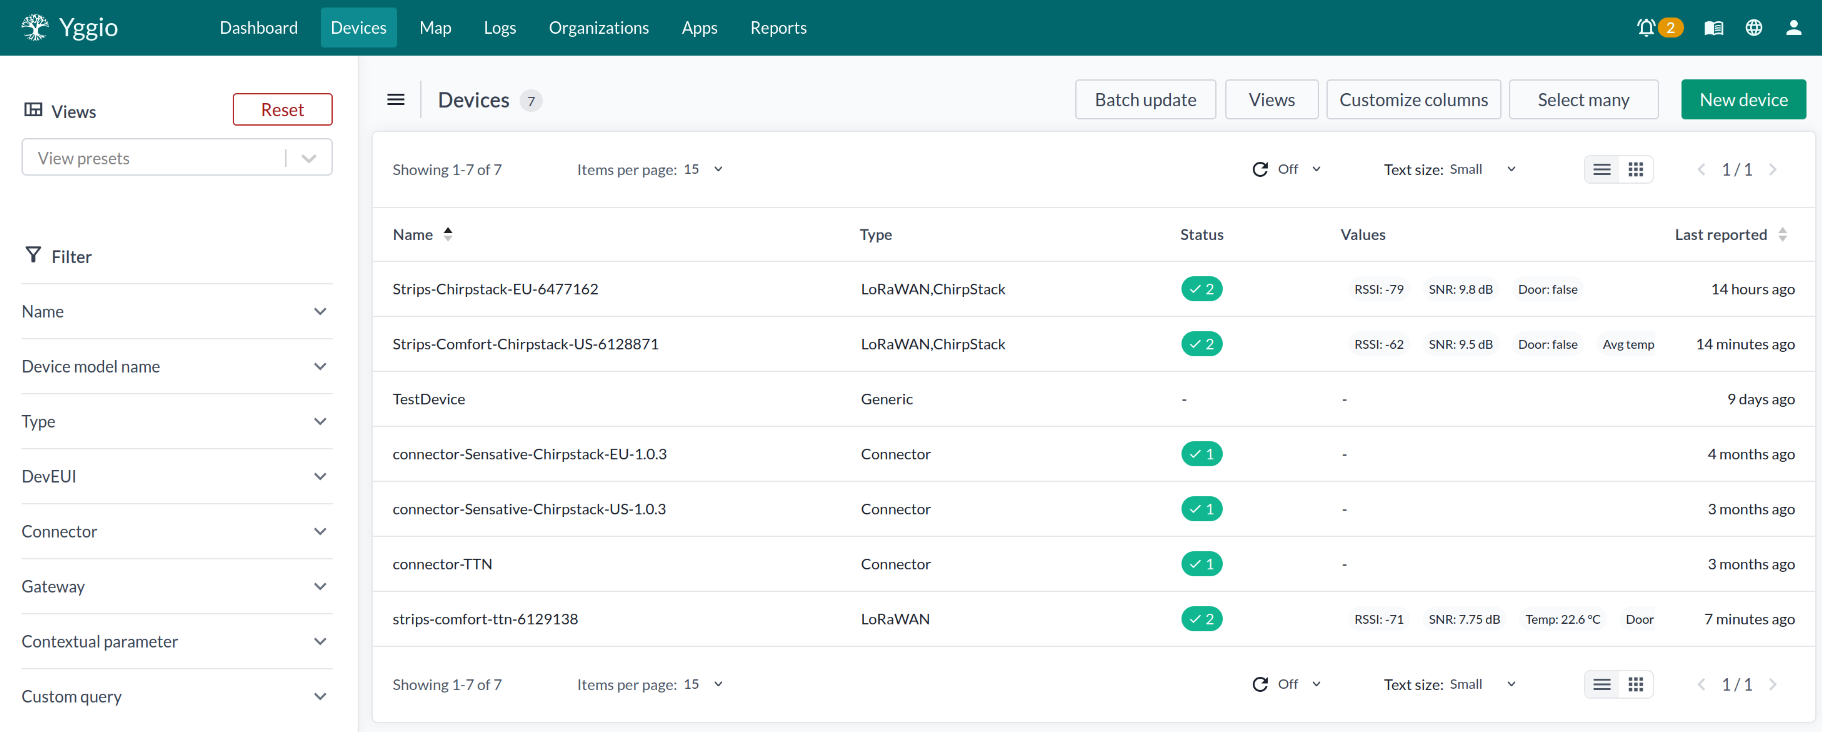
Navigating Device Details
When pressing a device, you are presented with a bar to the left where you can find all information about the selected device.
General Info
Here you find general information about the device. This is also where you can delete the device.
Specifications
Here you find technical information about the device.
Data
Here you find data from our time series, connectivity, or custom fields you have added using Install or Update. The data can be displayed in an easy-to-read form or "raw," which can easily be copied as code. The different colors on the values represent the type of data.
Charts
Charts only work on devices with timeseries data fields (e.g., temperature measured over time). Once a data field is chosen, select a time period, resolution, and calculation. The charts can be viewed with three different types of curves, and the y-axis is also flexible. The chart can only display 1000 data points.
Logs
Logs are created in response to specific events on a device, such as a name change or a downlink being sent. These logs, categorized by priority levels - low, medium, high, and severe - provide a detailed record of your device's activities. Users have the ability to 'acknowledge' certain logs. Any unacknowledged log with a high or severe priority level is classified as an 'alarm'. The current count of such alarms is displayed by the bell icon in the upper right corner.
Translators
This lists all translators connected to the device. Translators convert data from other devices and enables it to be presented in Yggio.
Position
If your device has a physical location, you can add its longitude/latitude here.
Access Rights
This enables you to share data about your device with other Yggio users. Enter the user's username, then choose if you want to give them an admin role, if they can write to the device (update the device), only read data from the device, or peek at one certain data point on the device.
Channels
View and create channels, which send data from your device to an external receiver. The data can be sent through many different protocols, such as MQTT, HTTP, etc.
Contextual Parameters
This is where user-created additional data is stored. Everything must be added as a key-value pair, where the value can be any type of data. The colors of the values represent the types of the data. The contextual parameters can be added, deleted, or edited by the user.
Commands
Commands support two separate ways to send downlinks. One requires a generic MQTT connector to send a downlink. The other function simply creates a button that can be viewed on the device and in the device list. Remember that for the button to work, you need to add a new rule to the rule engine and connect that to the button.
Calculations
If your device is a calculating device, an overview of the calculation will be displayed here. If your device is another type of device, regardless if it is connected to a calculation or not, nothing will be shown here.
Report Interval
Set how often you expect this device to send a report. You can use the rule engine to set up rules that trigger when a device has been silent for too long.
Tools
Tools can only be used if your device has a connector or if the device is a LoRa device. In the case of your device having a connector, you can choose to synchronize the device to force contact with its integration. In the case of your device being a LoRa device, you can import LoRa devices to fetch all devices from the LoRa server and create them in Yggio.
Using Batch Update
Batch update is a powerful function that can update 1000 devices simultaneously using a CSV file with valid device id's.
-
Create a CSV file. The CSV file must contain the ids of the devices you want to update, and the fields you want to update. It is important that the CSV file is formatted correctly.
-
Upload the CSV file.
-
If you are updating the contextMap on a device, the system will ask you if you want to add the new contextMaps or if you want to replace it.
-
Start the update. Depending on how many devices you are updating, this can take some time.
Edit translators
In the Select Many dropdown you'll be able to find the Edit translators function. This function will edit the translators that are connected to your chosen devices. You can either add, delete all, or delete last translator. The Overview bar will show you which translators already exist, which ones are being added and which ones are being deleted. The Overview is only a preview of what will happen. Please note that the changes made will only occur once you press the Confirm button.
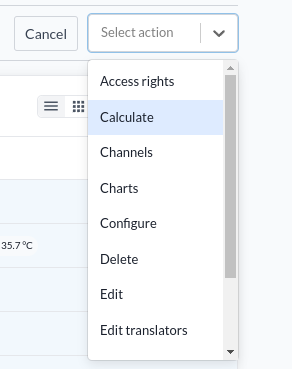
Select many
Using the Select Many feature, you can select multiple devices at once and perform actions on them. To use this feature, click on the Select Many button above the device list:

Then click on the checkbox in the top left corner of the device list, next to name, to select all devices, or click on the checkboxes next to the devices you want to select.

Once you have selected the devices you want to perform actions on, Select what action you want to perform at the dropdown menu at the top right of the device list, and you will be redirected to the selected action.
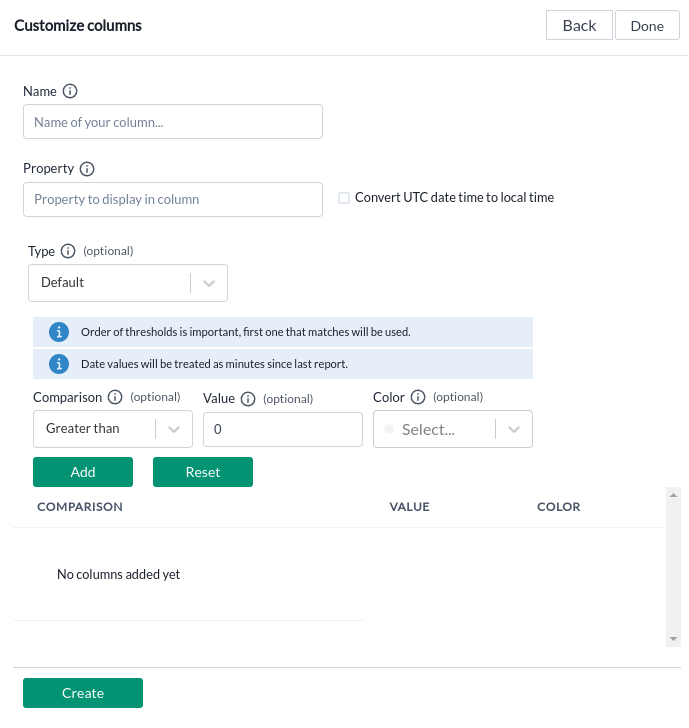
Customized columns
- Navigate to "Customize columns" by using the button on top of the device list.
- Move columns around by using the arrows or remove them by clicking on the X button. You can add existing ones by select them in the selection box in the bottom, and you can create new ones by clicking the New button.

Create a new column
- After clicking the New button on top of the "Customize columns" window, you can create a new one by filling out the fields.
- Name the column, enter the property of your devices you want the column to display (e.g temperature, batterLevel etc) and create a threshold if you want colored values based on different values (currently only supports numbers!).
Views
Views in Yggio is a way to save your current view in the device list, including filters, columns, and sorting. You can create a new view by clicking on the "Views" button on the top right of the device list.
Select presets
Select a preset to set a saved view of your devices. You can also select it from the sidebar in the device list.
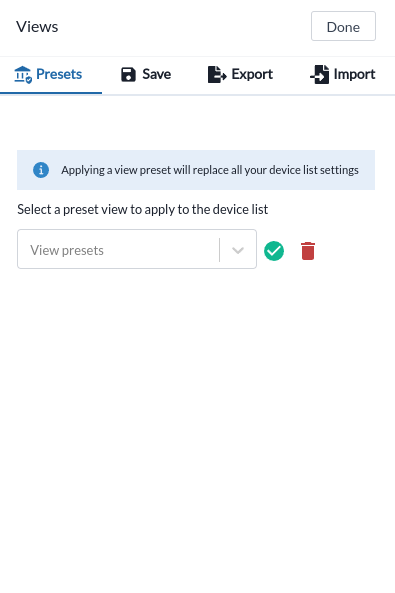
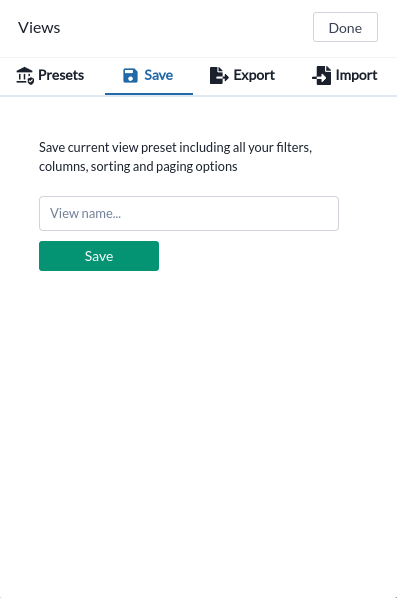
Create a view
Create a view by entering a name and pressing the Save button.
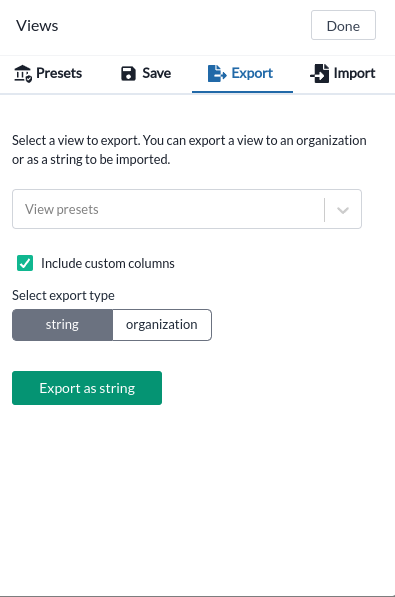
Export a view
Export a view by clicking the Export button, and select your view you want to export. Currently it's possible to export your view either as a base64 string or directly to an organization where all members of that organization should get access to the view.
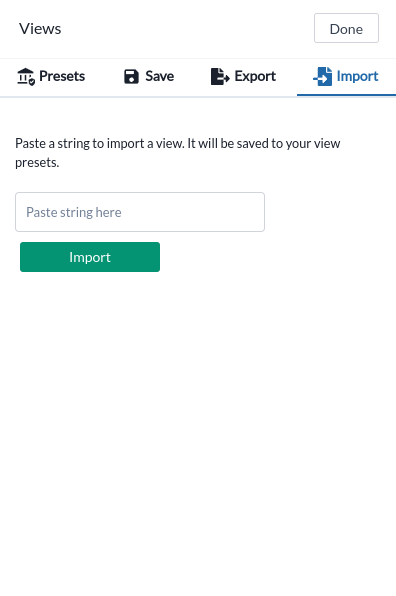
Import a view
Import a view by clicking the Import button, and paste your exported base64 string.
Control Panel V1
 Navigate to Control panel
-
Log in to your account
-
After you have logged in you should be directed to the Control panel
Adding devices to Yggio
How to connect an ICPE Z-Wave gateway to Yggio:
-
Login to Yggio with your username and password
-
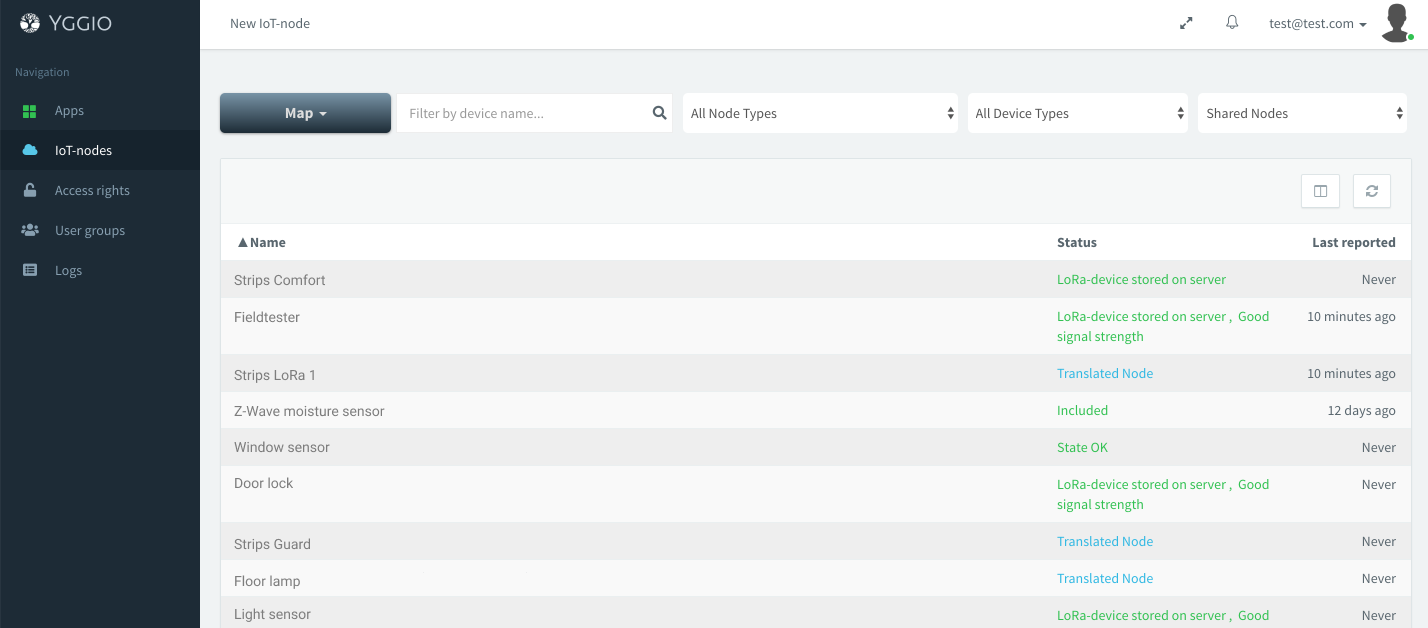
Navigate to IoT-nodes on the left side
-
Press the New IoT-Node button in the top left corner
-
Choose Z-Wave Gateway
-
Enter the Z-Wave Gateway Mac-address (Provided on bottom of ICPE) and press next
-
Give the Gateway a name and press Next
-
On Manage access rights press Next
-
On Overview press Save
-
You should be able to see your device if you filter for Z-wave gateway or search for the name it was given
-
Check if the gateway status is ”Gateway online”
How to include/exclude a Z-Wave device:
-
Locate your newly added Gateway in the IoT-node tab with filtering by Z-wave gateway
-
Press on your Gateway to open viewing popup window
-
Navigate to Z-wave include/exclude tab
-
Change mode to exclude with the crossing arrows
-
Press ”Start exclude”
-
Trigger the device for include/exclude
-
Confirm that you get a message saying your device is successfully excluded
-
Change mode to include with the crossing arrows
-
Press ”Start include”
-
Trigger the device for include/exclude
-
Confirm that you get a message saying your device is successfully included
-
Enter a name for the newly included device node
-
Save the device and close the popup window
How to connect a LoRa device:
Yggio supports several different LoRa integrations. For every integration, there needs to be a Connector created so that each LoRa device added can be connected to respective integration. If you already have a Connector set up, you can skip to step 4 for every new LoRa device you wish to connect.
-
Navigate to ”New IoT-node” on top left corner
-
Select device type ”ChirpStack Connector”
-
Fill in the necessary details provided by the chosen Lora integration
-
Once the Connector has been created, repeat step 1 then skip to step 5
-
Select device type ”LoRa”
-
Select which Connector (integration) you want to use
-
Select type “OTAA” or “ABP” as type, depending on your device
-
Enter device ID (devEui)
-
Enter Device Address (devAddr) (ONLY ABP)
-
Enter Network Session Key (nwkSKey) (ONLY ABP)
-
Enter Application Session Key (AppSKey) (ONLY ABP)
-
Enter Application Key (appKey)
-
Go to Step 2 (Details in tour guide) by clicking Next
-
Enter a suitable name for your device
-
Select correct model name (translator for your device)
-
Go to Step 3 (Manage Access on tour guide) by clicking Next
-
Go to Done step by clicking Next
-
Click on Create button to save the LoRA device
-
Find the device by filtering by “LoRa-node” or search for the given name
-
Click on the device name to open device popup window
-
Read the device manual for instructions on how to connect your device
-
When you have connected your device, press the refresh button in the top right corner of the popup window
-
Check the status of the device. Confirm that the device is reporting and is connected with a LoRa gateway. Please note that some devices can take a few minutes or more until they report data.